Heating Water with Fire
This is a guide to heating plumbed household water with fire, and all the related systems: circulation and thermosyphon; pressure considerations; pumps, cylinders and header tanks; wetbacks, boilers or water jackets; hydronic systems (radiator and underfloor); heat exchangers; incorporating solar, solar heat pumps, electricity and/or natural gas; and combining any or all of this into one harmonious system! Though I use our stoves in my examples, the principles discussed herein are not particular to Homewood, nor are they even specific to just cooking stoves. The below contains information that should be useful for anyone who wishes to heat a volume of water by burning wood – regardless of exactly what unit might be burning the solid fuel; provided we’re talking about systems more sophisticated than just a pot boiling away on a stove-top, or some kind of small attached reservoir.
Disclaimer: I am not a plumber. I am not a hydro-engineer. I am not a central-heating designer. None of these sketches are attempting to be technical drawings and should never be substituted for such. This guide only exists to help you better understand what your plumber might be talking about; it is not a ‘How To’ or ‘DIY’ instruction manual. After reading this article, be sure to still seek advice from a qualified tradesman, and make sure any and all work carried out conforms to any and all relevant rules, regulations, codes and standards as applicable.
Neither I nor Homewood Stoves accept any liability or responsibility whatsoever in regards to any possible outcome that could result from following any of the advice contained in this article. Again: I do not claim to be a plumber.
Zak – Homewood Stoves Ltd, June 2019
This is a “Living Document”, with my adding to it and tweaking things as relevant – so please appreciate that there will likely be working notes throughout contained in [brackets like this] and please get in touch if you have any suggestions or feedback.
This resource is designed to be read sequentially, with later sections building upon concepts only introduced earlier, so some backtracking may be necessary if you skip ahead and find yourself confused!
Contents:
– Before We Begin
– Some First Principles
– Some Important Terms
– Basic Low Pressure System
– Mains Pressure System
– Thermal Store System
– Making Your Choice
– Locating the Cylinder
– Sizing the Cylinder
– Running Radiators
– Underfloor Heating
– Supplementing with Electric or Gas
– Solar Water Heating
– Putting it All Together
– As Specifically Relates to Homewood
– Sourcing What You Need
Before We Begin
Over the past decade, I have helped to troubleshoot a seemingly-growing number of hot water systems that have been set up in weird ways that have resulted in less-than-satisfactory outcomes. As a result I have accumulated a depth of water-heating experience as specifically relates to cooking stoves, at a time when it really does seem that this practical knowledge is in decline, and the average plumber seems to be getting less confident in this field.
I have become increasingly frustrated to see people rely on tradesmen in good faith (and for good reason!) only to ultimately be left disappointed with a lacklustre system that, for want of just a few small changes, could and should have been great. This may not happen often, but when it does I really feel bad for the end customer: no one wants to outlay significant expense on something they don’t really understand, only to be disappointed with the end result.
Most of the articles I have found that cover these sorts of things are either too narrow (focussing on only one aspect), too technical (overwhelming with industry jargon, or brand-specifics) or too brief (not delving deep enough).
This article is my best attempt at producing a unified resource on fire-related hot water heating, in order to aid and empower you, the lay person end user who is going to pay for the water heating system, and be left with the day-to-day running of it, long after the last tradesman has left.
I strongly encourage you to read this article (first two sections at the very least) in order to get enough of an understanding of what’s going on and what you are hoping to achieve with your plans for hot water production, so you can in turn be confident with what your plumber is doing: that it will be done once and done right.
I’m always wanting to deepen my own understanding: if there’s any part of this that you believe I have wrong or you disagree with or seems lacking in some way, please email and educate me! Likewise, do get in touch if you feel any parts are needlessly confusing, or if you spot any dead links.
Some first principles
First point: HEAT RISES! This simple principle is foundational to understanding everything that follows. Your system must be set up in such a way that allows the heated water to rise up to where it needs to go, and for the cooler water to be able to drop down to replace it – all without impedance.
Second point: when things heat up, they expand to occupy a larger volume. If there’s no space for this extra volume, pressure increases. If pressure increases enough, things explode!
When water boils and turns to steam, it expands dramatically; suddenly needing to occupy a much greater volume of space as the liquid turns to gas. Understanding this is extremely important for managing the safety of the system. Your system must always have ways to safely deal with this potentially-rapid expansion.
Third point: when it comes to heating water, fire that is generated by the burning of a solid fuel (like wood, coal or peat) is known as an ‘uncontrolled heat source’. This just means that it is not something you can quickly turn on or off; not even if you were to learn that your system was about to boil. This is the major difference between what we’re dealing with here with woodfire, and the more conventional methods of heating water that use a controlled heat source (such as electricity, diesel or gas). Those types of controlled heat sources would simply switch off (automatically-via-thermostat) as soon as the water was sufficiently heated. We operate under different constraints; we cannot simply switch off our fire at will.
The reality of not being able to simply ‘turn off’ a fire on demand makes the second point about rapid expansion all the more important to safely manage, and also means that things must be plumbed in a way that makes it impossible to have water come out your sanitary fixtures (bath, shower head or hand basins) at unsafe temperatures (no more than 55° C for sanitary fixtures here in New Zealand – kitchens or laundries are allowed to be hotter). This is achieved by the appropriate locating of temperature-reducing valves (a clever valve that mixes cold water into the hot if needed; thermostatic control automatically changes the amount of cold being introduced depending on the heat, in order to always deliver hot water that has been reduced to a predetermined temperature).
Some important terms
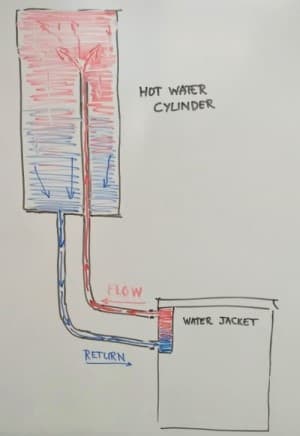
Water jacket: this is the thing inside your wood burner that is heating the hot water. Here in New Zealand they are commonly called ‘wetbacks’ due to their (usual) location on the back wall of the firebox and the fact that they contain water. They come in different configurations (snaking or laddered pipe, or just simple containers) and materials, but whatever form these take, they will always have the heated water exiting from the top (this is called the flow line) and cold water coming in at the base to be heated (this is called the return line). The water jacket is the lowest point of your system, and because heat rises, the heated water wants to escape from there to get higher.
Hot water cylinder: this is the tank that holds your reservoir of heated water. You have varying possible sizes, pressure configurations and connection types, but for now it is just important to understand that this is a large vessel (measured in the hundreds of litres) that will hold your heated water, ready for you to use it throughout the home. The water inside this will stratify, thanks to the first point about heat rising, meaning that the higher parts of the cylinder will hold the hottest water, with the coolest water settling to the lowest part. With what we’re doing, the hot water cylinder will be located well above your water jacket, allowing the heated water to leave the water jacket, travel up the flow line into the cylinder, displacing the cooler water which drops down the return line into the water jacket to be heated by our fire, in a continuous cycle of…
Thermosyphoning: due to the principle of heated water rising, and the configuration of the water jacket that sees cold water entering at the base and hot water able to exit at the top, thermosyphoning is what we call the natural circulation that results. This all happens without any pumps: it is passive circulation. Cold water enters at the base of the water jacket, is heated by the fire, leaves the top of the water jacket, travels up along the flow line, enters your hot water cylinder, displaces water cooler than it, which then gets pushed down and out of the cylinder through the return line, enters the water jacket at the base, and so on. Circulation continues in this cycle for as long as we have a heat source warming the water to create heat differentials.
This is probably all we need for now. I’ll explain any new terms as they get introduced.
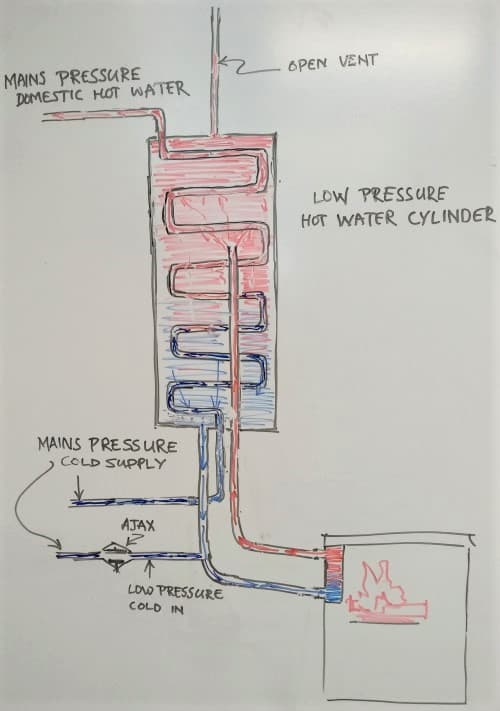
Basic Low Pressure System
This the simplest system you can have.
The water jacket connects directly to a low pressure hot water cylinder, via the flow and return lines. We see the water being heated by the fire, leaving the water jacket and travelling upwards through the flow line to the cylinder. We see the water stratified in layers of heat. We see the coolest water dropping out the bottom of the cylinder, travelling through the return line to our water jacket.
All the required elements to enable thermosyphoning are here: water jacket being heated by fire, hot water cylinder acting as storage vessel well above, flow and return line pipes communicating in a circuit between.
This is a completely passive system with no pumps of any kind required to make this process happen. This is possible thanks to the fact that the hot water cylinder is located above the water jacket, and the flow line pipe is constantly sloping upwards. The greater the height difference and the steeper this flow line, the more positive the circulation. In this example, good circulation is further aided by the presence of an internal riser pipe inside the cylinder, carrying the heated water up at least 2/3rds the height of the cylinder (less desirable, and now very uncommon, would be the flow line directly entering up into the side of the cylinder).
If your plumber is already talking about the need for a circulating pump at this point, stop. You do not want an active system, with a circulating pump pushing water between your water jacket and your hot water cylinder – you want it to thermosyphon. Natural circulation through passive thermosiphoning happens at a fluctuating rate that is perfectly matched to the stage of your fire: it circulates more slowly when the fire is getting established or dying down and speeds up when the fire is hotter. A circulating pump can (at best!) only ever approximate this. Set too aggressively, and a circulating pump can be cycling more cold water through the firebox than you want during the startup phase of your fire – excessively cooling things and collapsing combustion temperatures at a time when what you’re wanting is to be establishing good thermal mass in the firebox for efficient combustion. Set too languidly, and a circulating pump will push water too slowly in the hotter stages of a fire, allowing the water in the jacket to overheat, or even boil. A circulating pump could do both – fire temperatures fluctuate, so a pump trying to take the middle road in order to average out the rate of flow is liable to do a poor job at both ends. You have no such concerns with a system that has been correctly set up to passively thermosiphon – the heat of the fire drives the rate of circulation, so flow rates always match what your fire is doing.
Moreover, this kind of circulating pump (now that you’ve made it integral to managing the flow passing through an uncontrolled heat source) introduces excessive complications and multiple points of possible failure: the pump itself, the electrical supply, and the vital thermostat(s) that would have to control it all. Just don’t do it.
A pump will likely be getting suggested due to your hot water cylinder being in a poor location (eg: lower than the water jacket; or in a place where some sections of the hot flow line has to travel horizontally or even downwards; or a long distance from the water jacket; or all of this at once!). My strong advice is to not proceed if this is the case. Sort out a better location for your cylinder that will enable thermosyphoning, or where that’s not possible, reluctantly skip on water jacket heating altogether (sticking with standard electric/gas/solar alternatives instead – we can always supply any of our stove models without a water jacket). You want the circuit between your water jacket and hot water cylinder to be passive – it is simply best, and I’ve seen enough convoluted systems relying on artificial circulation go wrong that I will never recommend the compromise. You do not want to be pumping anything through the water jacket in a Homewood. They are designed for passive circulation.
Back to our basic system!
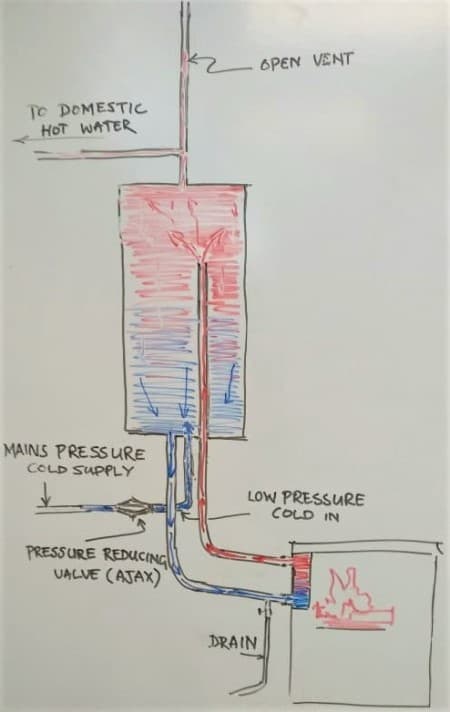
You are heating water which is getting stored in your hot water cylinder, and you’re drawing this heated water off the upper part of the cylinder any time you turn on a hot water tap (faucet) throughout your home. This leaves out the indicated domestic hot water line, and everything ‘downstream’ of this just follows standard household plumbing, irrespective of how the water has been heated (excepting the already-mentioned need for temperature-reducing valves to regulate the water down to safe temperatures, due to our dealing with an uncontrolled heat source and potentially scalding temperatures).
Whenever you open a tap to draw off hot water, cold water enters in (cold supply) at the base of the cylinder to replace the volume you just drew off. This main supply line is at full pressure (‘mains pressure’): coming either direct from your street in town-supply situations, or from a header tank or a water pump/pressure tank. Because we are running a low pressure system here, this cold water has to come through a pressure-reducing valve (normally called an ‘Ajax valve‘ here in NZ) which reduces the pressure of the incoming water down to match the system.
Finally, we have our open vent: that thing sticking up out the top – the highest point of the system. This is tall enough that no water is spilling out the top of it, but low enough that if the Ajax valve was not present (and so water was coming in to the system at full pressure), water would be spilling out this vent onto your roof. Most importantly: this open vent is low enough that in the event of your system boiling (and if you are consuming less hot water than your system is producing, temperatures within the cylinder will continue to rise until it inevitably boils) steam will erupt out this vent in a dramatic geyser. This pressure determined by the height of your vent is known as the ‘head’ and your Ajax valve is set to match.
Were this open vent not there, and your temperatures reached boiling point, the resulting pressure would cause an explosion. Either your water jacket, the plumbing in between, or your hot water cylinder itself would rupture. No matter the location of failure, this would be dangerous (and extremely messy), so everything we do plumbing-wise must ensure that any potential steam being produced by our uncontrolled heat source can always escape out an open vent.
So: your water jacket must always be connected to an open-vented system. An open vent means low pressure – you must never circulate mains pressure water through the jacket.
This is simple to achieve in a low pressure system like I’ve outlined, as the hot water cylinder itself is open vented and we are connecting directly to it. Here in New Zealand, the pressure of the water coming in (set by the Ajax valve) to a low pressure system cannot exceed 120 kPa, with an appropriately-sized head (cannot exceed 12.0 m) on the open vent to match. 76 kPa is the regular “low pressure” amount for low pressure systems.
Boiling aside, that open vent also takes care of the differences in volume that water occupies at various temperatures; so you may sometimes hear a little water spilling out on to your roof as it heats up and expands, even when not yet up at boiling temperatures.
Did you know?
An interesting side-phenomenon I’ve observed: in a low pressure system you might sometimes notice the cylinder making tell-tale rumblings – that she’s about to boil! Thinking to prevent this from happening, you rush to turn on a hot tap (the cold replacement water entering the cylinder will cool things off so it doesn’t boil, right?) only to have the cylinder boil right at the very moment you turned the tap. A dramatic fountain of steam erupts out your open vent up on your roof! If only you’d been just a second sooner you could have prevented it.
Actually, no. What has happened is that the water inside the cylinder was already above 100 degrees C (the normal boiling point of water, if at atmospheric pressure). Because the system is under pressure from the head of the open vent, it takes higher temperatures in order for the water to vaporise. But by opening a tap, you relieved the pressure in the cylinder, and before the cold water ever had an opportunity to rush in and replace what you drew off, the already-above-boiling-temperature water instead expanded and turned to steam. It was going to boil anyway, but your pressure-release accelerated it!
If you’re trying to prevent a rumbling cylinder from boiling, you are likely already too late.
So far, this hopefully has been pretty easy and straightforward to follow. This is the simplest (and usually the cheapest) option, and once-upon-a-time almost every home in this country was set up in this way (complete with coal range to match). But it does have a major downside that an increasing number of people find intolerable in this day-and-age (and the clue is in the name): low hot water pressure; namely poor shower pressure.
If you’re used to this, or like the fact that low shower pressure means low water usage, great. You can stop here (or jump down to sections on location, size, supplementing, radiators and so on).
Upsides: simplest plumbing. Conserves the most water. Cheapest to install.
Downsides: poor hot water pressure! Unsatisfying showers. Struggles to push hot water long distances.
If you want stronger hot water pressure though, let’s complicate things a little and look at…
Mains Pressure System
In this type of system, your hot water is held at mains pressure (anything above 120 kPa here in NZ, but usually 350 – 700 kPA) inside the cylinder, meaning that when you open a hot tap or turn on your shower, it forcefully comes gushing out at the same pressure you are used to from your cold water taps.
It will look something like this:

It’s pretty similar to what we’ve already seen: the water jacket remains the lowest point of the system, the hot water cylinder is raised well above. The flow and return lines are doing the same basic thing. We’re still drawing our domestic hot water off the top of the cylinder where the most heat stratifies, and introducing our cold supply in at the bottom.
But no longer is the water jacket connecting to the cylinder directly; now we have it forming a circuit with a coil within the cylinder. And our open vent has shifted from the hot water cylinder over to this coil / water jacket circuit instead (remember: the water jacket must always be connected to an open vented system!). There’s no longer an Ajax valve reducing the pressure of the cold supply coming in to the cylinder; the water within is at mains pressure (hence the name again) – so it is unable to be open vented (or it would just all keep pouring out). The hot water cylinder instead has a relief valve (we’ve covered the risk of explosion, so this is a double failure valve: this relief valve opens on either pressure or temperature and is known as a TPR valve – Temperature/Pressure Relief valve).
This system is still passive – all my objections to pumping through the jacket are still there! Heated water still passively rises up the flow line from the water jacket, but now rather than directly connecting and feeding into the cylinder, the coil keeps things separate, and the water inside the hot water cylinder is heated indirectly by this coil in a heat exchange process. This separation allows us to still thermosyphon even though we have two different system pressures.
Because the coil is elongated to span much of the cylinder, things are still able to circulate: the water drops down through the coil as it cools, equalising in temperature with the water surrounding it. This continues the thermosyphon.
If the system heats up enough, the temperature (and/or pressure) within the mains pressure cylinder triggers the TPR valve: this opens, ejecting the too-hot water; cold water rushes in, pressure and temperature eventually reduce enough for that valve to close. The water jacket circuit meanwhile has also cooled via the coil, and everything is under control again. If the water jacket circuit ever boiled before the cylinder (though this really shouldn’t happen, because TPR valves open at lower-than-boiling temperatures, and the coil is sufficiently large [see next point, just below] that it allows for greater transfer of heat than the water jacket is producing – both facts meaning that the cylinder keeps the open-vented circuit ‘cool’), then it would safely escape as steam out the open vent, just like in a Basic Low-Pressure System, with the water coming in to top up this circuit being reduced to low pressure with an Ajax valve.
If you collect your own rainwater, you probably want this very hot TPR-vented water to be able to be reclaimed and recaptured by your guttering some place.
Important elaboration on coil size:
As touched on above, the coil within the cylinder needs to be sufficiently large in order for all the heated water within the coil to equalise with the surrounding water in the cylinder, before it leaves the cylinder to head back to the water jacket. It is not the coil transfer rate that drives circulation, but the production from the water jacket (hot water will always keep pushing up from the jacket, even if that means it has to push not-yet-equalised water ahead of it away down and through the coil). The heat exchange capacity of the coil needs to be able to keep up with the flow rate!
This is normally expressed in kW ratings; eg: if you have a water jacket that is producing around 5 kW of hot water, you want a coil that is large enough to be transferring at least 5 kW across to the cylinder. I was once told that every 1 m of 25 mm coil pipe (@ 70 degrees rise) gives you approximately 1.4 kW of energy transfer.
There is no issue with this coil being larger than needed (it would just mean that the heat exchange process has completed sooner, and the coil water has equalised with the cylinder water well before leaving), but if it was smaller than needed you would have problems. The fire would continue to heat the contents of the coil / water jacket circuit at a higher rate than the coil can transfer this heat across, and it will boil, frequently (you don’t have much volume in this circuit!), reducing the efficiency of your whole system to well below even that of the low capacity coil, and putting undue stress on your plumbing.
Coils also come in different varieties – many of which are only intended to ever be pumped through (eg: for solar or radiators – you know what I’ve said about pumping though a water jacket!) and as such are too-squat to thermosyphon effectively through. Make sure the coil in your cylinder is an elongated thermosyphoning coil (‘wetback coil’ here in NZ) of sufficient length to match (or exceed, ideally!) the production of your water jacket.
This type of system is slightly more complicated to plumb (but not massively), as rather than just needing a single main supply of cold water to replace the used (or ejected) water from the cylinder as in the low-pressure system, here we need to be prepared to replace water in both the hot water cylinder (done in the usual fashion with the bottom entry cold supply) and the open-vented low-pressure water jacket/coil system. This would normally be done with a second cold supply entering into the return line (as shown in the picture) of the coil / water jacket circuit, with an Ajax valve reducing the pressure down to match the head of your open vent just as in the Basic Low Pressure System.
A mains-pressure cylinder is more expensive than a simpler low-pressure cylinder with direct connections, because of the coil and also because of the extra manufacturing required in order to have it able to withstand the greater pressures involved. I guess there would also be a small increase in plumbing costs due to the slight increase in plumbing complexity, but that oughtn’t be too significant.
Even so, modern expectations about water pressure means that this has now become the most common way to set things up, and really the only time I’d suggest you don’t go this route is where you have a water supply that is less-than-abundant, or some other clear plan that requires you to do something else.
Upsides: great water pressure! Great water pressure means satisfying showers, and ease of pushing hot water to fixtures located further away (or upstairs)
Downsides: higher initial investment; slightly more complicated plumbing; great water pressure = greater water consumption; if the TPR valve triggers and opens it will eject significantly more hot water than an open vent on a similar-sized low pressure cylinder would
Now, we can get around some of these downsides (at the cost of introducing others), by combining the two systems we’ve already looked at, into a…
Thermal Store System
This is a setup that sees the water jacket connect directly to an open-vented, low pressure hot water cylinder in exactly the same way as in our first system. But then instead of drawing our domestic hot water off of the top of this cylinder at that same low pressure, we instead have a coil acting as an indirect heat exchanger (as in our second system) – with the crucial difference here being that this coil itself is at mains pressure. The coil is our cold main supply entering at the base of the cylinder at full pressure, snaking through the tank and exiting at the top of the cylinder all nicely heated up (but still at mains pressure) to deliver household hot water throughout the home.
Any time you turn on a hot tap, cold water rushes through that coil at the same pressure as your cold supply, gets heated up and arrives to you all nice and hot. It’s hot water on demand.
This type of system suits situations where you can have a large volume of hot water stored (yep, clue was in the name again!), one that is always kept up at good warm temperatures.
Whenever you needed domestic hot water in the first two systems, you could always just draw the most-recently heated water from the top (hottest!) part of the cylinder, so even if those systems hadn’t been running for very long and things weren’t yet fully heated, you still had an available volume of usable hot water stratified at the top. Here though, the coil evens and averages these temperature differences out, and a small volume of very hot water sitting right at the top of a not-long-heated cylinder isn’t much use to you. You can’t just draw it off, and there’s not yet enough of it to act in a meaningful way on the cold water rushing through. The surface area of coil present in just that top strata is pretty small – there’s just not going to be enough time for temperatures there to equalise.
Rather than just deliver you the hottest water from at the top, a thermal store system will give you warmed water that is much closer to the average temperature of the whole cylinder. So, it’s hot water on demand, provided you are maintaining decent heat (55 C+) throughout the whole cylinder.
To maintain this heat throughout the whole cylinder, you want a larger-than-normal cylinder. The water being heated up as it races through the coil is of course cooling the surrounding water in the cylinder – with a larger cylinder, this is a smaller proportion of the total volume stored, so has less effect on the average. You don’t really want to be letting this store of water cool down either (meaning for those times that you don’t have the fire in use, you’re supplementing it with solar water heat or just electric).
For this reason alone, I do not recommend this type of setup over the regular Mains Pressure System unless you have a compelling reason for it.
That compelling reason may be that you have a situation where you never want to be drawing your potable water directly out of the hot water cylinder; and this may be because you have some additional complication going on, over-and-beyond what has already been discussed (for example: you’re feeding radiators or solar directly from or to the cylinder, contaminating the water within, but this would be against my advice lower down).
My strong advice here: only go with a Thermal Store System in situations where you have a good reason to, understand why this reason exists, and are prepared to manage it (via the significantly larger cylinder, and backup or supplementary heat sources).
Upsides: the same strong hot water pressure of a Mains Pressure System, but with arguably simpler plumbing (or at least plumbing that may allow you to get around some other complication)
Downsides: larger cylinder required; need to maintain good warmth in that large volume as you can’t just quickly boost the top section; if you allow the cylinder to cool you will only get tepid water while reheating it
Making Your Choice
Basic Low Pressure System: will suit where you are wanting to minimise water consumption; don’t mind low pressure showers; don’t need to run hot water long distances (or up); want to keep plumbing as simple as possible; want to minimise costs.
It will not suit you if you want strong hot water pressures!
Mains Pressure System: will suit where you want strong pressure hot water; have ample water supply; properly understand coil size requirements; are prepared for the extra costs involved.
It will not suit you if you have any kind of water scarcity; are on a tighter budget; or fail to correctly size coils!
Thermal Store System: will suit where you want strong pressure hot water; have provision to store and maintain a very large volume of warm water; and you have some complication that prevents you from just setting up a Mains Pressure System.
It will not suit you if you can only have a smaller water store; are regularly letting the cylinder cool; or could be just setting up a Mains Pressure System anyway!
Again, my recommendation is to default to a Mains Pressure System, except where you have good reason not to. Because of this, most of my examples hereafter will default to featuring a mains pressure system – but please don’t take this to mean that everything else I cover is only possible at mains pressure.
Locating the Cylinder
Deciding on an appropriate location for your hot water cylinder is going to be your important first step. The location is going to determine what size options may be available to you, and if considered carefully, will set you up for straightforward and problem-free plumbing!
If you’re considering all these kinds of things as part of a new build that is only just now in the planning stages, great – you have scope to make accommodations to suit. If not, well – you’re constrained to making the best of what you’ve got.
Ideally, the cylinder is going to be located close enough to the stove that the total length of the communicating pipework (flow plus return lines) stays under 10 m. The further your cylinder is from the water jacket, the longer this pipework will be in between. The longer those pipes are, the more you are going to be losing heat (these lines will be lagged with insulation to minimise this heat loss, but still: the longer, the greater the heat loss).
In some situations, you may be able to capitalise on this heat loss. Imagine a situation in which the water jacket pipes penetrate through the wall behind the cooker, and travel in this new room or cupboard for some distance before going up into a cylinder in the ceiling cavity. If this space behind was somewhere you wanted extra warmth (eg: it’s a cupboard for airing laundry), then great! A nice bit of harmony, so long as you’re still sending enough heat to the cylinder to satisfy your domestic hot water needs.
Hot water can run a long way, but just realise that you must accept some amount of heat loss the longer these runs go. [I wish I had a handy rule-of-thumb that said something like: ‘for every extra metre of run between heater unit and cylinder, expect ‘x’ amount of heat loss’. If you know something like this, please let me know!]
Next, let’s consider the height of the cylinder relative to the stove.
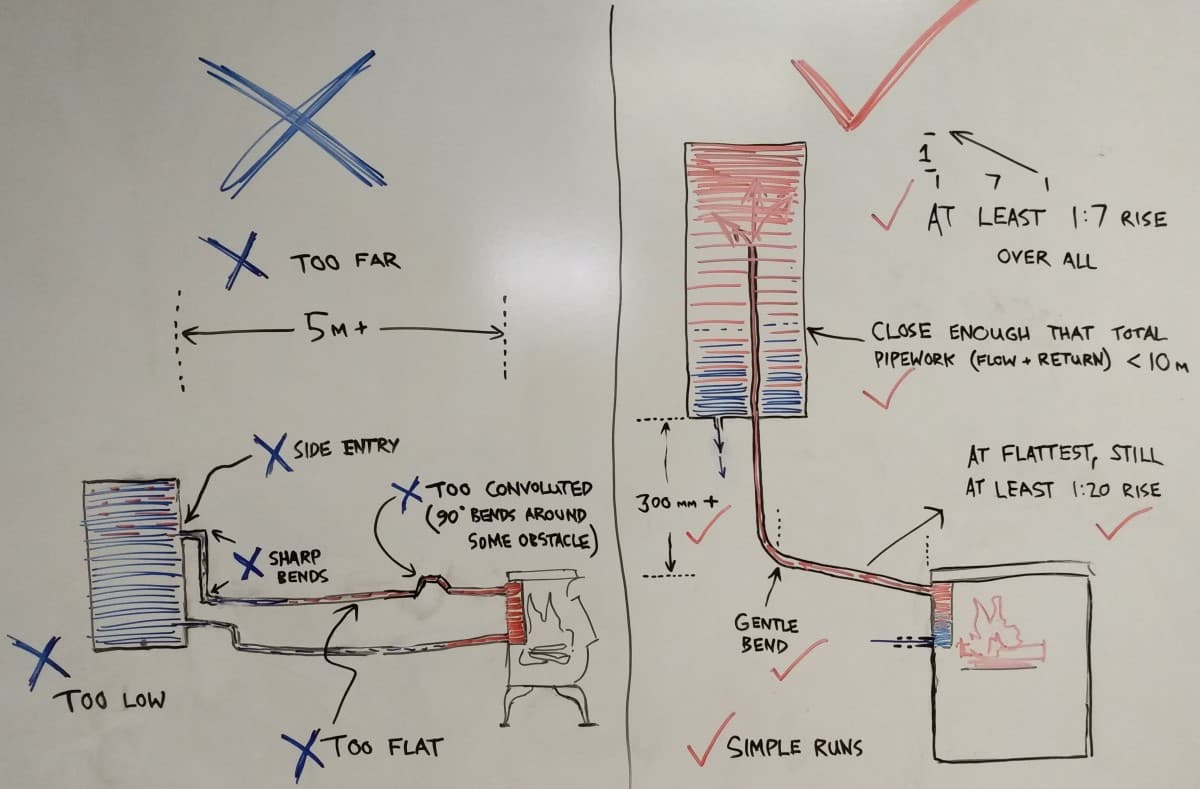
As we’ve learned, thermosyphoning only works where we can take advantage of heat rising and cool dropping, so this necessitates a hot water cylinder that is located well above the water jacket. Here in New Zealand, our building code and plumbing standard specify this for us: the base of the cylinder must be raised above the top of the water jacket by at least 300 mm (where the cylinder has the flow line riser pipe carrying up 2/3rds inside of it), or at least 600 mm (where there is no such internal riser). Basically all modern cylinders have the internal riser, and that’s what you want.
This height difference between the cylinder and the water jacket isn’t enough by itself, though, the hot flow pipe (leaving the water jacket and entering the cylinder) must have a constant upward slope on it, such that the average rise overall is at least 1:7 (that is, for every seven units it moves horizontally, its must also be moving at least one unit up), and that no part of it ever slopes at less than 1:20. It can’t ever be flat, and definitely can’t go down.
This is talking about a low pressure hot water cylinder (so Basic Low Pressure System, or Thermal Store System). Where the water jacket connects indirectly via a coil (Mains Pressure System), I believe the 300 mm distance between the cylinder base and water jacket top still applies, as the coil acts in the same pro-circulation fashion as the internal riser. I do not believe that you can take that 300 mm differential from the lowest point of the coil though; stick with the cylinder base.
Now, these are minimums – greater heights promote greater circulation. Greater circulation is necessary where you are producing greater amounts of hot water (say our Matriarch unit, or the Homewood Heritage when fitted with the higher capacity water jacket – see the penultimate section for specifics on our stoves), or to overcome some less-than-ideal plumbing (a stretch of the hot water return that isn’t as sloped as it we’d like it; or an excess of sharp 90 degree bends in the plumbing – these slow down the circulating, adding to our nominal pipe lengths even if the actual length isn’t increasing).
A cylinder raised 1 m from the top of the water jacket and within 3 m from the stove is going to have much more positive rise (1:3) on the flow pipe (and therefore much more positive circulation when thermosyphoning) than a cylinder raised the same height but 8 m away (as this second one would have much flatter pipes: only 1:8 – too low; poor circulation). The further the cylinder from the stove, horizontally-speaking, the higher it must be raised to compensate.
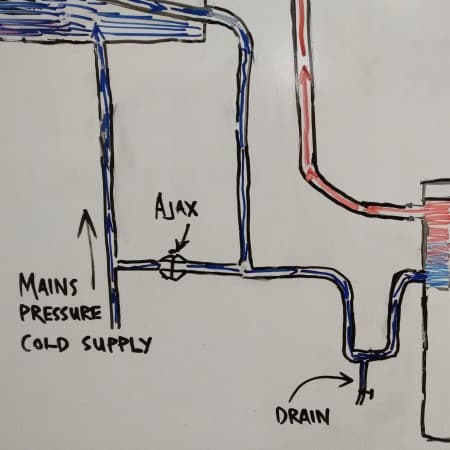
While the hot flow line must always be on this continual slope between the water jacket and the cylinder, the same is not strictly true for the cold return line. Generally though, your return will just run alongside the flow line – with a couple of possible exceptions. To prevent back-circulation from ever occurring (newly-heated water that wants to push back against the incoming cold, due to there being a rise there), a ‘U’ shaped run on the return line, just before it enters the water jacket, is often installed. That way, the bottom of the ‘U’, and not the water jacket, is the absolute lowest point in the system, and no water heated in the jacket would ever try sink down there. This helps maintain good circulation and as it’s the lowest point in the system would also be where you locate a system drain if needed/desired. When part of an indirect circuit (as in the Mains Pressure System with its coil) this flow line would also need to have a pressure-reduced cold water feed coming into it (to replace any water that might get boiled out).
An aside: the New Zealand plumbing standard actually allows for more flexible situations, where the hot flow line goes up, across a ceiling space, then down(!) to a cylinder, while the cold return drops under the floor from the cylinder, then runs up to the water jacket: an over/under system. These sorts of more convoluted configurations all call for more complicated plumbing and/or venting to compensate for the downsides and keep circulation happening, so again: stick with what is simple unless you are extremely confident in your plumber’s abilities and have an exceptionally good reason to justify the added complexity! Even if you did manage to get it all working away merrily, with good passive circulation, the NZ Building Code is explicit when mandating minimum rises, so I personally wouldn’t be terribly interested in testing which bureaucracy wins out!
Hot water cylinders are typically pretty tall (an upright tube – we’ll get to this very soon when we start examining sizes): depending on your situation, you may be limited as to what you can achieve. For those with high ceilings, a cylinder sitting raised in a cupboard beside or behind the stove is going to be great – give plenty of height and positive circulation; minimise pipe run and give a nice warm cupboard handy to your installation. Likewise on a second storey.
For many people though, the cylinder is probably going to end up in an attic or ceiling cavity. This is fine, but you’re just going to have to accept that you’re not really going to get to take advantage of any heat loss coming off the cylinder (modern cylinders are all pretty well insulated to begin with, but you could always wrap extra insulation around one up in the ceiling).
For space reasons, some people resort to locating the cylinder outside the dwelling. While not exactly ideal (though personally, I would sooner do this in order to still have it run passively, over locating it somewhere indoors that meant you needed to employ a pump to push heat down) it’s not completely out of the question either. You’d want some kind of enclosure to protect it from the elements, give it lots of extra insulation to really minimise heat loss as much as possible, and don’t have any of the communicating pipework outdoors where they’d be exposed to frost or ice risk.
Similarly, in order to achieve the required rise on the hot flow pipe, some people resort to a cylinder in a horizontal configuration (a tube on its side). You may be tempted to do this when trying to get a cylinder high enough in your ceiling cavity to get a (now lower) roof-mounted solar water panel to thermosyphon up to it as well. But there is a big downside to a horizontal cylinder: far less stratification. There’s less vertical height for things to settle into layers, and less height difference between where the heated water comes in and the (supposedly!) cooler goes out. This results in much higher internal turbulence, with the cylinder temperatures far more mixed. Ultimately, you have less of a marked difference between hot water at the top of your cylinder (that you’re wanting to draw off) and that cooler water leaving at the bottom to the water jacket. The result is circulation much poorer than if the same-sized cylinder was instead just in the usual, upright position.
This is good enough reason to avoid a cylinder in horizontal configuration if at all possible – re-evaluate whatever plans are necessitating it being on its side.
Finally, when deciding on a location, it is important to consider the rest of the plumbing in the house.
It may not be best to locate the cylinder super close to the stove, only to then have to run excessive lengths of domestic plumbing to sinks or bathrooms located long distances away. Efficiency loss between the water jacket and the hot water cylinder may be preferable (because you’re less likely to notice!) to having this same efficiency loss being at the other end: it could be much more noticeable and annoying to have to wait long times for cold water to eventually run warm when turning on a tap (only to then have that volume then left in the pipework immediately start to cool down all over again once the tap is off).
Having said that, you really do want to settle on a location where the plumbing between the stove and cylinder (ie: the passive thermosyphoning circuit) can still be as simple as possible. You want to minimise bends and flatter sections in your flow and return lines, and if these are to connect to coil connections on the side of your cylinder (as in a Mains Pressure System), you want the cylinder orientated so these face the direction things are to run. You want all this to happen while still keeping things accessible for ease of plumbing!
These goals may likely be at odds with one another. You don’t want to have to wait a long time at the tap for hot water to arrive, but nor do you want needlessly-convoluted plumbing that interferes with the circulation between the water jacket and the cylinder.
Discuss happy compromises with your plumber.
A prime example of this (and one I’ve witnessed first hand), is a situation where it ends up being ‘simplest’ for the plumber to employ an excess of sharp 90 degree bends in the pipework to navigate it over and around some obstacle to get where he needs it to go. They can get these 90 degree bends off the shelf, no bending work required. They are very convenient, but every 90 degree bend in the flow line impedes circulation by a calculable amount. One or two may not make much difference on a cylinder with the proper height, but start adding in too many extra, and you definitely need to keep raising your cylinder even higher to continue promoting good circulation.
Far better, is a plumber who knows this, uses only gentle bends (maybe even forming them himself), and is working with a situation that gives nice simple runs in the first place.
Sizing the Cylinder
You’ve sorted a location, so you can now work out what size cylinder you can accommodate. In general (and I do have one key exception to this – covered at the end of this section), I recommend people get the largest hot water cylinder they can fit into their available space and budget.
Yes, a larger cylinder will take longer to heat up from cold when first installed, but after you’ve gone through the initial exercise of warming up your stored volume of water, the cylinder size no longer really factors into the day-to-day running. What you’re now concerned with is maintaining temperatures instead, and this is dependant on the amount of water your household is using, versus the amount your water jacket is producing.
If you’re using some average volume of hot water per hour, your system needs to be able to replace that volume of water, completely irrespective of your cylinder size.
So why insist on a large cylinder then? If the size doesn’t even really matter, a bigger cylinder is just going to mean larger initial investment, and more hassle figuring out where to fit it.
Here’s why: a larger cylinder means a longer lasting store of hot water, better able to cope with periods of high water usage and allowing more time in between lighting fires; and a larger cylinder means a longer buffer period before it boils for those times the fire is going but hot water isn’t really being used.
The larger the cylinder, the larger buffer it gives you in both directions: less likely to run out, and less likely to boil. Bigger cylinders give a more flexible window around using the water before it boils, and a more flexible window around having to relight and reheat your stored water for those times you don’t have a fire going.
There are not many situations (outside of radiators, but we’ll get there in due course!), where you are going to be neatly using a constant ‘x’ amount of hot water per hour, perfectly averaged out over the time the stove is operating and matched to the water jacket’s production. No, water usage normally fluctuates wildly: a rush of heavy use in the morning with pre-work or school showers, minor usage throughout the day, then a rush again in the evening might be typical. If the average person in this country uses 40 – 60 L of hot water per day, you can be sure that this does not tidily translate into some ‘per hour’ rate. Likewise, water production will fluctuate: you generate far less hot water with a fire that is just establishing heat (or dying down) than with one that is already nicely ticking over, or roaring!
A larger cylinder is capable of keeping you supplied with hot water over those busy periods when usage outstrips production because it has stored up an excess (and the total volume is cooled less, proportionally-speaking, by the introduction of replacement cold water), and is better able to absorb the extra heat over those times when production is exceeding consumption. Again: it better acts as a buffer to smooth everything out.
With a small cylinder, you have a constant tension: don’t use hot water quick enough, and your system boils – losing the heated water and stressing your system. Use too much at once though, and you’re quickly reduced to lukewarm or tepid water. Yes, if your consumption of hot water was perfectly matched up to your production, smaller would be great in theory: take up less space and be cheaper to install – but that’s just not how real world water usage works.
If you already appreciate what I’m saying here, feel free to skip this detailed example:
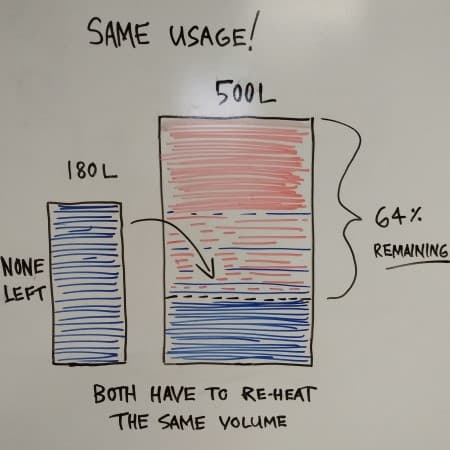
Imagine a situation where a family have a 180 L mains pressure cylinder, perfectly plumbed to a Homewood Heritage, such that it is being heated by an average of 4.5 kW per hour while in normal use. It was running the previous evening, and the hot water cylinder is sitting at around 70 degrees C when the fire gets stoked back up this morning.
Dad has a shower for 5 minutes. In this country, most showers use somewhere between 10 and 20 L of water per minute. This family is loving their newly-installed mains pressure, so let’s say it uses 20 L per minute.
Now, we can’t just simply say that Dad used 100 L (20 L per minute multiplied by 5) of hot water straight from the cylinder though, because as we learned right near the beginning, our regulations specify that domestic hot water at basins, baths and showers is only allowed to come out at a maximum temperature of 55 degrees. As our hot water is currently sitting at 70 degrees in the cylinder, before it reaches the showers it is mixed with regular cold water at the tempering valve to bring that down to the 55 degree limit. To achieve this, 700 ml at 70 degrees is mixing with 300 ml at 20 degrees to produce 1 L at 55 degrees (play around with this: http://www.onlineconversion.com/mixing_water.htm). Of course, it’s not quite that simple, as every part of water that Dad is drawing out of the top of the cylinder is being replaced by an equal part of cold (and there’s stratification within the cylinder at play too) – but we’re just going to ignore that.
Now, 55 degrees would be a super hot shower, so Dad is reducing that down further at the shower head, by having the shower not fully turned to hot. In the interests of keeping this ‘simple’, I’m going to say that Dad likes showering at 40 degrees. To get 1 L of water at 40 degrees we’re mixing 575 ml of the already mixed down 55 degrees with 425 ml of the 20 degree cold. This means that for every L of his shower, around 400 ml of that has come from the cylinder – 40%.
His 5 minute (100 L) shower uses 40 L of the hot water in the cylinder, which is replaced by 40 L of cooler water, dropping our average temp in the cylinder to around 59 degrees (again, it’s not a simple 1 for 1 replacement able to be neatly calculated like this, due to stratification – but hey, close enough for my purposes!).
Someone else showers immediately after, again for 5 minutes. This time though, the temperature we start at is lower, and it’s taking less cold water to reduce it down to the comfortable 40 degrees – by the end of this second shower, hot water is no longer being reduced down at all at the tempering valve (as it’s already coming through from the cylinder at less than 55 degrees), and they had to manually turn down the amount of cold being mixed at the shower head in order to maintain the warm 40 degrees.
The third person to shower that morning is going to run into problems.
Quite quickly, they won’t be adding any cold at the shower head at all, 100% of the water they’re using is instead coming direct from the cylinder. Where the first person only used 40 L from the cylinder, and the second around 45 L, the third is having to use nearly all their water from the cylinder, and for this same 5 minute (100 L shower), they are rapidly out of anything even vaguely warm: if they persist for the full 5 minutes, they’ll be very cold.
Another way to think of it is near the end of these 15 minutes, nearly 100% of the warm water originally in the cylinder has been replaced by cold. Those first two people have used nearly 50% of the warm water, so approximately 90 L of cold water has entered the cylinder before the third person even begins their shower.
If the cylinder had been 500 L at 70 degrees to start instead, this ~95 L used up in the first 10 minutes of showering would be only 19% of the stored volume (instead of 50%!), meaning that the replacement cold coming in would have had far less cooling impact on average temperature of the total volume. The third shower (and beyond!) could have happily continued, unaffected.
This covers the first reason to have a big cylinder: a bigger store of hot water means you can use more of it before the amount of cold replacement water coming in has an appreciable impact on the overall temperature, proportionally speaking. It will also last longer for those times the fire is out.
Reason two, and back to our example:
With their 180 L cylinder and 2 and a half showers, average temperature has dropped to basically cold: not much more than 20 degrees before shower number 3 was abandoned. People leave for the day, and Mum keeps the fire going. She does some baking on the stove, but isn’t really using hot water outside of a few dishes. That 180 L though, just keeps getting hotter. With hot water production at approximately 4.5 kW (minus Mum using a small amount) from the water jacket, the temperature in that cylinder is rising by about 20 degrees per hour (again, for the sake of simplification, I’m ignoring heat loss from pipework and/or the cylinder itself!).
In about 4 hours, the cylinder approaches boiling temperature.
It’s mains pressure: the TPR valve opens before it hits 100 C, and ejects most of the contents (which is of course replaced by cold!) before closing.
Early that afternoon, Mum goes to run a bath, and is confused by the lukewarm water. She’d been running that fire all morning!
Again, had this cylinder been 500 L instead, by the time the three showers were done in the morning, the average temperature in the cylinder would be down somewhere around 55 degrees. To heat that to boiling temperature at 4.5 kW is going to take nearly 6 hours instead of the 4 hours it took the 180 L cylinder down at 20 degrees, giving Mum a nearly 50% larger window to have used it.
This is the second reason a bigger cylinder is preferred: the increased volume of a larger cylinder gives you extra time before boiling, once your consumption drops below your production. Again, a bigger buffer to work with.
If you settle for a small cylinder, you’re going to be continually walking a knife edge: if you use water too quickly it runs out, and if you use it too slowly it boils! This can quite quickly become a constant source of stress (quite literally, for the stressed pipework!): I once lived in temporary accommodation that only had a 30 gallon cylinder (113 L – tiny) to which we connected a Homewood Companion – that 113 L was always alternating between boiling and running out, and it felt like we never properly had hot water for all the months we stayed there! Go big.
Times when bigger may not be better?
The downside of a large cylinder is that it takes longer to heat up that very first time you light your stove. In typical situations, where the stove has been installed in a primary dwelling as an integral part of a lifestyle choice that see you using it all the time, this is no big deal – just a part of the initial running in process. Once you’re up to temperature, you’re away! You’re now only ever concerned about heating up the replacement cold water – and replacement water is always going to require heating no matter the cylinder size.
But what if you’re instead setting up your system in a place that sees only partial habitation? A place where the stove isn’t going to see regular use: in a holiday home, mountain cabin, hunting lodge, tramping hut, beach house or any other secondary-type dwelling? What if you are installing it in your primary residence, but you have a lifestyle that results in similarly intermittent stove usage? You may travel a lot; you might work shifts that see you away from home for days on end, or that mean when you are home you’re just sleeping and not running the stove at all; and so on!
In these types of situations, the fire is only going to be run infrequently. You may visit only irregularly, or for short stays only. You no longer have the stove ticking along maintaining things. While you are away, and without a heat source to keep it warm, the water in your cylinder will eventually cool right down to room temperature, meaning that each time you return, you need to restart the process of heating this water store all the way back up again. No longer can you just think about your usage and the need to maintain temperatures based on the replacement water coming in – you’re having to also consider how quickly you can get usable water temperatures from cold; maybe even each-and-every-time you get to run the stove! Here, the maximum volume becomes a very relevant consideration.
If it only takes a 180 L a couple of hours to get up to those usable temperatures, but it takes a 500 L cylinder more than twice as long to do the same, and you know that your cylinder temperatures will frequently be allowed to cool right off, then this may well be valid reason to opt for a smaller water store.
Just be aware that smaller cylinders will still have the same downsides (quicker to run out, quicker to boil) that we’ve been trying to avoid by going big. If you do go with a smaller cylinder, you may wish to consider setting it up with a radiator or two – something to use up surplus heat and prevent boiling when your stove does see extended use. If you do decide to stick with a larger cylinder in circumstances like these anyway, just be prepared to put up with initial heat-up each time you return (unless while you are away you have a supplementary heat source – like solar – maintaining that stored volume up at temperature for you).
But
For more typical situations, where you’re planning to run the stove regularly, as an appreciated part of your family home life: bigger just is better.
Pre-existing Size Issues?
If you are already stuck with a poorly-sized cylinder, and it is having a negative effect on your quality of life (boiling too frequently/running out too often – usually go hand in hand!), don’t completely despair. You can slow it from boiling by introducing some kind of insulation between your fire and your water jacket (eg: brick!), which will bring the production of hot water down to more manageable levels; or you could install a cheap thermocouple on your water jacket return line and be alerted to those times that the temperature is climbing to the point where you need to use up some water.
If you are finding that your small amount of stored water means that you are often running out whenever you have a busier house than normal (the grandchildren come to stay!), really the most effective solution (short of a major reconfiguring) might be to add a gas water heater downstream from the water store to boost and supplement the supply when needed (you’ll see further down, there are clever ways in which a califont of the correct type can be appropriately located to operate only at those times in which it is needed; lying dormant otherwise).
[insert a table of showing some cylinder dimensions at varying sizes here?]
Running Radiators
A Homewood is not a central heating solution. None of our stoves are dedicated central-heating units (unlike this sort of thing: www.marshallheaters.co.nz) – they are cookers first and foremost, and they all put radiant heat out into their install location, warming the area. Using them to run radiators should always be a secondary consideration (but by no means a bad one!). Having said that, you can supplement the water heating of your stove with other heat sources (solar, gas, electric – all covered later – or a second solid fuel unit with water jacket elsewhere in the home) to start getting closer to actual central heating.
My main recommendation here is to find an experienced plumber or central-heating installer who knows what they’re talking about and dealing with; ideally one that understands and agrees with my suggestions!
But as an overview, here’s how my ideal system looks:
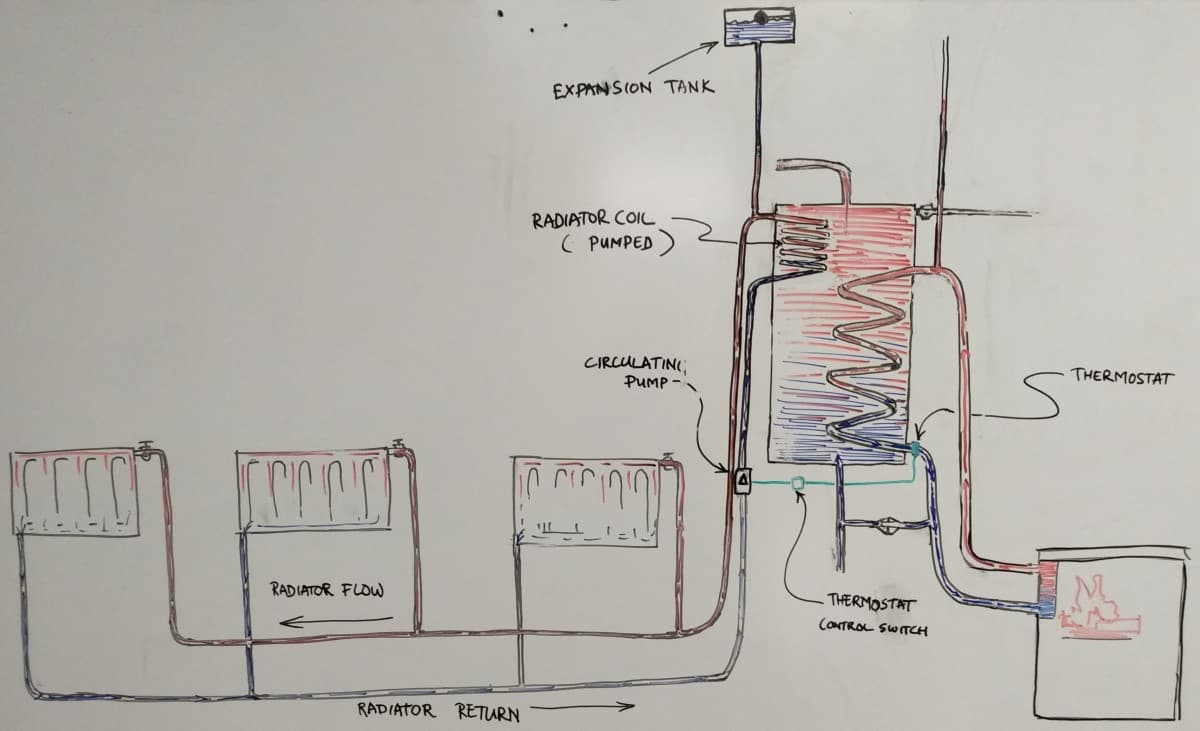
The water jacket still connects only to the hot water cylinder (either directly, if a Low Pressure or Thermal Store System, or indirectly via coil, if a Mains Pressure System, as in this example). As always, this side of things always just runs passively and is never pumped.
We’ve introduced a radiator system, connected to a new coil in the cylinder (preferably in the hotter upper portion), and forming their own separate circuit: if your make of radiator panel requires that you introduce any fluid other than water (eg: anti-rust glycol, inhibitor-treatment) this keeps all of that completely separate from your domestic hot water.
The radiators run with a circulating pump (as you’re needing to push heat down, so thermosyphon principles work against you here) as an active system. They are not passive. When this circulating pump is on, water is pushed through your circuit at a set flow rate, heats in the coil (much in the same way we saw the cold supply water be heated via heat exchange in our Thermal Store System) and distributes that heat to the radiators before returning back to the coil, cooled and ready to be heated again.
This circulating pump is thermostat-controlled, with a two-step switch: set up so your radiators switch on at a certain hot water cylinder temperature (say 80 degrees), and switch off at a lower one (say 60 degrees) – this can and should be tweaked to suit (and you’d likely want manual overrides). This thermostat control should be located on the cold return line in the water jacket circuit, as close as possible to where it leaves the cylinder (so a very close approximation of the coolest water in your cylinder). Tying your radiator system to what is going on with your hot water cylinder like this is great: radiators will take heat away before your cylinder ever gets a chance to boil, but also switch off as temperatures drop – so you always have hot water available for domestic use.
Set up in two-step fashion like this also means that once your radiators kick in they stay on for good periods rather than operating in bursts (a single-step switch would mean that as soon as your radiators switch on, your cylinder would be immediately cooled with the introduction of the cooler radiator water causing it to just switch off again right away; operating in annoyingly-sensitive bursts until things eventually equalise).
The radiators are set up in parallel (not series!), so individual panels can be turned off (or down) and on (or up) as desired, without interfering with the overall circuit. This lets you adjust the heat outputs to comfortable levels at different times or seasons, and to conserve energy when not needed at all. You have flexibility and control to set up a system that takes your lifestyle into account (eg: you might have a radiator panel in a study that only really gets turned on during weekends; one in a spare room that stays off unless you have guests staying; others in bedrooms that never run during the day – and so on). I am sure that there are fancy options out there for automatically managing the timing of these sorts of things that you could look into if you really wanted (probably better suited for controlled-heat sources that are also switching on and off on demand, though), but know that it can always be done manually: each radiator should have a tap for adjusting – or turning off – the flow of hot water coming in.
As always, water expanding and contracting depending on the temperature fluctuations means that you need to have a way of dealing with this on the radiator circuit side of things: that’s why I show an expansion tank. This is just gravity fed and open to atmosphere: when the radiators are cool and the water within takes up less volume, the extra is supplied by this tank; when they’re hot and the water is taking up more volume the excess is able to be held in this overflow tank. If the liquid in your radiator circuit needs to be inhibitor-treated, this reservoir would be also.
I have not shown an open vent on this radiator circuit. Unlike elsewhere throughout this article, where one might be implied, this is a deliberate omission. I do not believe you need one in my example, due to the fact that the radiator system is buffered by the hot water cylinder.
The hot water cylinder is acting as an intermediary between the radiators and the uncontrolled heating of the water jacket circuit: so it should be impossible for the radiator side of things to ever heat above the temperature of what is held in the cylinder. I’ve shown a mains pressure cylinder, meaning the TPR valve on that is going to open and eject the too-hot water from the cylinder before reaching boiling temperatures, which prevents the radiator side of things from ever having to worry about it (if the TPR valve were to fail – though remember they are double failure – and the radiator side of things boiled before the cylinder ruptured, the radiator’s expansion tank would act as an open vent, erupting steam and boiling water somewhere you definitely haven’t planned on having steam show up. If we’re talking about TPR valves failing though, things are already very serious, and the bigger worry would be your cylinder rupturing!).
The more I’ve learned and seen, the more I’ve come to really appreciate what I’ve just outlined: radiators that are set up to be running indirectly off of your domestic hot water cylinder like this means you get to use your regular hot water cylinder as a heat store and buffer tank for the radiators and the radiators act as overflow and buffer for your cylinder!
Both systems run in conjunction with each other: the radiator circuit doesn’t boil, thanks to the buffering of the hot water cylinder (cylinder will eject water before temperatures reach that high); the cylinder meanwhile should never really boil anyway, because the radiators are acting as an overflow for it.
As the fire dies down, radiators continue to circulate for a time using the stored heat of the cylinder (though with the two-stage set up, still switch off before they rob you of all your hot water!).
You maintain passive, open-vented circulation through the water jacket at all times. You are not introducing any inhibitors or anything like that from the radiator side of things across to the water jacket circuit. Your radiators are never directly connected to an uncontrolled heat source.
It’s beautiful!
Here is how your plumber will likely suggest doing it instead (and it should be noted that if you’re retroactively installing radiators, and don’t already have the necessary coil in your cylinder to do it the way I recommend, this really is your only option):
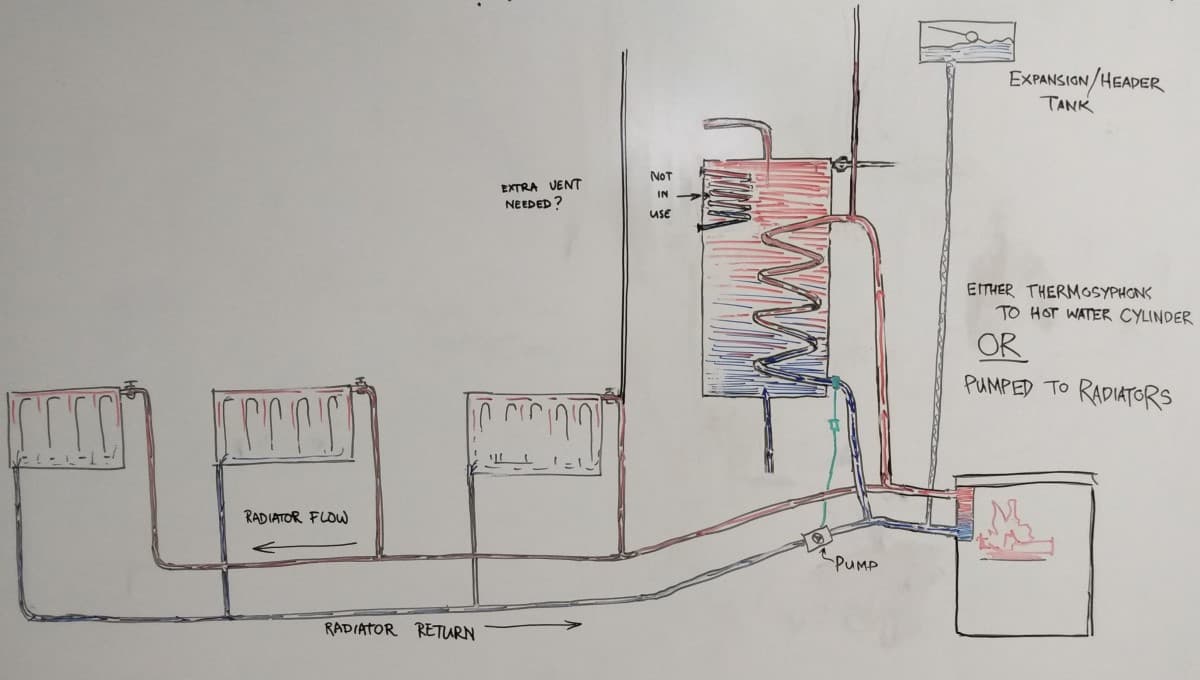
This seems to be the most common way that radiator systems get set up. I do not care for it. I’ll explain the reasons for my dislike, and you can decide if you agree with me.
Once your cylinder hits a set temperature in this setup, your radiator circuit kicks in like normal, but now instead of taking its heat from the already-warm cylinder, the radiators are now fed directly from the water jacket. Your water jacket has stopped thermosyphoning with your cylinder and is now solely feeding radiators via their circulating pump. It’s an all or nothing thing: 100% of the hot water production is either being sent to the cylinder, or to the radiators.
There is no buffering involved any more – the radiators are being heated directly (and the cylinder not at all) by the water jacket whenever they are on. To take advantage of a buffer tank, I’ve seen plumbers want to complicate things even further, by introducing a second cylinder: the water jacket connects to and thermosyphons with the first cylinder that still supplies your domestic hot water, but once that cylinder is up to a set temperature a circulating pump kicks in and pushes water through your water jacket over to the second cylinder that is feeding and buffers your radiators (yes, with their own circulating pump!). Don’t do this. This is the kind of inelegant, superfluous complexity-creep that this article is hoping to help you avoid! If your plumber is ever trying to explain why you need a second cylinder for anything at all, make sure you understand and agree with his reasoning.
Where my preferred option always keeps the water jacket thermosyphoning passively, with circulating tempo naturally changing based on the stage of the fire (just as we like it), here the circulating pump takes over and constantly pushes water through the water jacket at a set flow rate any time the radiators are on – irrespective of the state of the fire. If you’ve forgotten exactly why I so strongly objected to ever pumping through the water jacket, jump back up and give that section a reread!
To prevent the circulating pump from continuing to push cold water through your water jacket (cooling your stove) after your fire has died out, the thermostat that controls the pumps needs to be carefully located and definitely set to a single On/Off temperature: again, on the cold water return line out of the cylinder, as close to the cylinder as possible. Let’s say it’s set to 60 degrees: once the circulating water in the return line reaches that temperature, the thermostat triggers and the circulating pump kicks in, diverting all hot water production to the radiators. When someone turns on a hot tap, drawing water from the cylinder and introducing cold, this thermostat will drop below the set temperature (even though the line that this thermostat is on isn’t currently circulating, it’s very close to the main supply that just dumped cold water in – so should still be pretty quick to respond), switching off the pump and allowing it all to thermosyphon again. Shortly, the thermostat on that cold return line will hit the 60 degree set temperature again, and the pump switches on, stopping the thermosyphon, and so on.
Even if these were the ‘only’ issues with this way of setting up radiators, I’d be preferring the first option already, but you also have far less flexibility in this system. Because we are now sending all hot water production to the radiators (with no buffering), our radiators need to be consuming all this production or the circuit will continue to heat until it boils (and because your radiator system now directly connects to an uncontrolled heat source, it must be open vented! Possibly with more than just the vent for the water jacket).
This need to balance up production and consumption makes this way of setting them up a total non-starter for situations where all you were ever wanting was one or two panels to act as overflow for your domestic hot water production (with the side benefit of warming some cooler part of the house). In this type of setup you must always closely match (ideally exceed, to be safe) the water jacket production with the size and quantity of panels you install.
Let’s say you’ve installed four 1 kW radiator panels in this style of system, and are running them using the regular water jacket off the Heritage (4 – 5 kW in normal use). You have a healthy fire going, and are producing more like 5 kW today (outputs always fluctuate based on the heat of a fire: the more aggressive the fire, the higher the heat). Your cylinder is up at 60 degrees, and not consuming any of the extra output. Your radiators have fully heated, and are radiating 1 kW of heat into their respective areas. Because you are directly connected to an uncontrolled heat source, that surplus kW is now raising the water temperature in your radiator circuit until, sooner or later, it will inevitably boil. Someone is working in one of the areas and, finding it to be a bit hot today, switches off the panel in their room? Now you have an extra 2 kW that cannot be radiated away, still being pushed around, speeding this radiator circuit boiling process.
In my preferred system, this sort of thing is no big deal: the surplus production just gets absorbed by the hot water cylinder (why I say it acts as a ‘buffer tank’). This would also apply the other way around: those times that the radiators might be drawing more heat than is currently being produced, they just take it from the cylinder (until the cylinder drops down to the switch off temperature).
If radiators are consuming less heat than the water jacket is producing, the cylinder will slowly rise in temperature, buffering the difference. If the radiators are consuming more heat than the water jacket is producing, the cylinder will slowly drop in temperature, again buffering the difference.
You cannot take advantage of any of this with the more common way of setting them up, and have more issues to be managed: need for close matching of production with radiator consumption; possible cross-contamination from the radiator circuit into the water jacket circuit; water jacket no longer naturally thermosyphoning, so more points of failure (yes, I have heard of a water jacket rupturing when the circulation pump failed but the water jacket couldn’t thermosyphon to safely vent); increased plumbing complexity; far less harmony in the overall system.
So I strongly recommend that you follow my preferred system as first outlined; except where you have good reason to do otherwise, and fully understand all the resulting implications. I encourage you to discuss that good reason with me.
By having radiators run off a hot water cylinder that is going to be storing and buffering heat anyway, you can do interesting things. You can install more total kW of radiator panels than the stove is producing, knowing that you don’t intend to have them all on at once or at max output (or accepting that the system will just run in cycles for the times you do have them all on: cylinder reaching higher temperatures, radiators switching on, taking more heat than the cylinder needs to maintain, so eventually switching back off once the cylinder drops sufficiently, and repeating) – allowing you to target heat to different areas of the house at different times of the day. Or you can install just a couple of radiators that are using far less heat than what the water jacket produces, but you just want them to target one cooler area, and help manage your hot water levels by providing an automatic overflow use for those times that your water production exceeds your domestic consumption, giving you a bigger window to use some of your hot water.
Without your cylinder acting as a buffer tank, you need to match your radiators and their heat consumption as closely as possible to the production of your water jacket – and because fire fluctuates, this is far easier said than done. I’d actually install more total kW of radiators than expected production, accepting that (if all on) they will radiate at less than 100% output, than to try hit it exactly and be constantly overheating your radiator circuit (remember: no matter the heat in radiator circuit, the panels cannot radiate more heat than their rating, a 500 W panel is a 500 W panel because this is its maximum output. A 1 kW panel can operate as a 500 W panel by turning down the hot flow coming into it though).
Even if you weren’t requiring your stove to be producing any hot water for your own domestic usage (where you have other arrangements in place for domestic hot water production) and all the water jacket is ever doing is running radiators: I’d still do it the first way so you have all the benefits of a buffer tank while allowing the water jacket to thermosyphon passively!
Here’s a convoluted (though not convoluted enough to require bringing in supplementary heat sources – yet!) example of the sort of thing you could achieve if you really wanted (by no means intended to be typical or prescriptive):
You have the Homewood Heritage (with our higher output, advanced water jacket option), producing 8 – 9 kW of hot water for you while in normal use. You have a 350 L hot water cylinder; it’s set up for mains pressure, with the water jacket heating the cylinder water indirectly via a 10 kW coil (a little larger than needed, no problem). Your cylinder also has a 6 kW coil to run radiators (while planning, you decided that 6 kW was the max you ever really needed to draw for radiators at any one time). But you’ve set up 10 kW total of radiators.
If they were to all be on at once, they’d output at only a little over half heat into their areas (as the 6 kW radiator coil isn’t large enough to be transferring any more than this), but you never planned to have them all on at once. You have 4 kW spread across some bedrooms; you’ve decided you only want these to come on between 7 and 10 at night, and back on at 5 – 7 in the morning to take the chill off. You have 2 kW of underfloor heating (yes, I go into depth about this later, for now imagine it as a horizontal radiator that is both consuming and giving off a set amount of heat: 2 kW in this example) spread across the main bathroom and an ensuite, and this is always on. You have a 1 kW radiator panel in your study, and you only really get to use this on weekdays, while the children are at school, so it’s normally on from 10 – 2, Mon-Fri. The kids have a large play room at the other end of the house, and the radiator in there is 2 kW and runs for much of the weekend, switching off in the evening.The Heritage is installed in your open plan kitchen/dining/living area, and you haven’t installed any panels here as the stove itself is taking care of heating this space.
In the evenings and morning, the bathrooms and bedrooms are drawing 6 kW (your radiator coil size). During weekdays your system only needs to run at 3 kW, and over the weekend it consumes 4 – 5 kW over the daytime, depending on whether or not you get time in your study.
This mismatch between your production and fluctuating consumption is buffered by your 350 L cylinder.
Other considerations with radiators:
While the way in which you choose to have your radiators circulate is of fundamental importance, there are other things you need to be aware of and considering when working out what you want to achieve.
Coil Size
The coil feeding the radiator circuit wants to be equal to or greater than the radiator consumption. If it were to be smaller, it would bottleneck the total kW output across your panels down to its capacity. But if larger, you needn’t worry that this could overheat your radiator circuit (the radiators are only using 3 kW, and the coils keeps sending you 6 kW, so the water in the radiator circuit is eventually going to boil, right? Wrong!) – at most, the water in the radiator circuit can only ever equalise with the water surrounding it in the hot water cylinder; the cylinder is acting as its heat supply, it cannot magically end up hotter than the thing it is getting its heat from! Because we’re pumping our radiators, this coil needn’t be the elongated thermosyphoning type of coil that a water jacket connects to. It can be squatter, with flatter rise: a pumped coil.
Circuit Pipe Locations
Ideally, the radiator circuit flow and return lines are contained within the walls of the house. This way, any heat loss is contained within the home and your pipes and walls get to act as a kind of radiator. This is only really feasible on completely new builds. If you don’t mind the look, they could instead run on the outside of the walls, discretely along the skirting. The heat coming off these pipes then will rise off to warm the areas they run through, but might feel like an old hospital or school!
Most retrofitting of radiators will see these lines run beneath the floor though, ideally between the floor boards and your underfloor insulation: idea being that at least some of the heat lost off them might yet be reclaimed up through the floor (depends entirely on how impressive your insulation: heat does want to rise though). Avoid running these lines through the ceiling cavity: all heat loss off of them is wasted up there [is this true? https://www.smarterhomes.org.nz/smart-guides/heating-cooling-and-insulation/ventilation-and-heat-recovery-systems/].
Positioning the Panels
Individual panels are best located low to the ground (first point: heat is going to rise off of them), and perhaps somewhat counter-intuitively, ideally on external walls beneath windows. This maximises heat differential (warmth being introduced below a cold blank surface), which in turn encourages air in the room to move, circulating well for more even heat distribution. If it weren’t for that, I’d be locating them discretely beside the room entrances, able to be hidden by open doors.
Styles
Panels come in all different types, shapes and outputs. Select to taste.
Sizing the Panel to the Room
Have no idea where to start with matching kW outputs to rooms? Get a hold of some cheap electric heaters of a known kW output, and run them for multiple hours in different rooms and configurations (you don’t want anything thermostat-controlled here, just simple ‘always on’ electric heaters of specific power outputs). Yes, the harsh direct heat being thrown (normally in one direction) by an electric element isn’t going to perfectly match up to the feel of multi-directional radiant heat coming off a water-feed radiator panel, but leave it on long enough in a closed room and the overall effect ought to give you a very good starting point. Too cold and you’re going to want bigger, too large and you will want smaller (though do remember panels can always be turned down from their maximum).
Retrofitting Radiators, or Planning to (Maybe) Install Some Later?
Setting up radiators might be more of an investment than you’re prepared to commit to right away, or you might not yet have a good sense for how warm your new home (or new stove!) is going to be, or maybe you just want to see how you get on before deciding whether or not you’d like a couple to act as overflow for your cylinder – whatever the reason, you might be thinking you’d like to revisit the possibility of installing some radiators later.
That’s totally fine, and may well be a sensible idea! It’d be a shame to outlay significant expense, only to never really use them after being surprised by the job your stove does at keeping your house warm. Especially if it’s a new build with modern insulation!
If you think radiators might be something you want to retro-fit later, the key thing is to have made sure you sourced a cylinder with a heating coil already in it from the start. If you didn’t, and add radiators in later, you’ll either be replacing your cylinder (neither a cheap nor simple exercise!), or you’ll not be following my recommendations for setting them up. If you are now at the point of buying a new cylinder anyway, and are unsure about radiators or not – you may find that getting one with a coil to run them is not much more expensive, and worth doing to keep future options open.
If you are retrofitting radiators without the coil in the cylinder to run them off, you will have to settle for T-ing your circuit directly into your water jacket, as in the second way I outlined. Re-read all the negatives to pumping through your water jacket and this way of doing things, and make sure you’re managing those downsides as best as possible.
If it’s also a low pressure cylinder to which the water jacket directly connects, you would be cross contaminating into your potable water if you were to just add in the radiators, so to prevent this you are going to need to incorporate at least one heat exchanger unit, thereby making one part (cylinder to rest, or radiators to rest) connect only indirectly. Good luck, and I hope your plumber knows what he is doing!
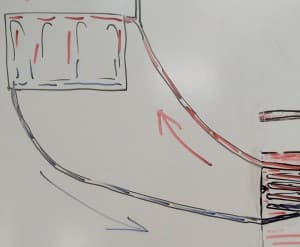
Thermosyphoning Radiators at a Higher Level
Earlier, I mentioned that we can’t get thermosyphoning working for us when it comes to radiators, because of the need to push hot water down. This is not strictly true. If the radiator panels were higher than the hot water cylinder (say a second floor), and configured in an S type flow (hot entering the top of them, cooling as radiates out, cooled water dropping out the bottom and returning to the cylinder) or a ladder arrangement (main hot line along the top, communicating with a cold line along the bottom through multiple vertical pipes – probably the vast majority of radiators) rather than an M or W type flow (which again, would require hot water to travel down, really interfering with circulation) it would thermosyphon.
Getting Radiators to Thermosyphon when at a Lower Level?
Remember back in the cylinder location section, when I broke from everything I had taught you about thermosyphoning to briefly mention over/under systems that work by having hot water rise well above its cylinder before pushing down into it? Likewise, imagine a situation where the radiator flow line leaves and goes very high up (second floor/or ceiling), then drops down to radiators. This will also thermosyphon, to some degree of effectiveness (presumably determined by that initial rise). Water getting heated by the coil must rise (because that’s what things do when they heat up!), even if that rising water is having to push already warmed water ahead of it down and out of the way. But…
Problems with Thermosyphoning Radiators
You have a bunch of complications that you have to then contend with when trying to set up radiators to thermosyphon: unpredictable flow rates through your panels (due to them no longer being pumped at a set rate); managing your circulation priority (it’s thermosyphoning, so will want to passively circulate as soon as any temperature differential exists: no more tidy controlling On and Off at set temperatures to maintain nice temperatures for your domestic hot water); more complicated plumbing and venting… It all very rapidly gets outside my pay bracket!
I would never attempt a non-pumped radiator system without the close and enthusiastic involvement of an experienced expert.
When Run in Conjunction with Electric Element
As we’ll look at below, most cylinders in New Zealand, even ones purchased to be connected to a water jacket system, will still have an electric element in them. This is normally a good idea, as it provides a backup for those times your stove is running less (eg: summer). Like our radiator circuit, this element will be thermostat-controlled, so only come on in those times that the stove is not maintaining cylinder temperatures.
The thing to be aware of here, is making sure that the thermostat for your electric element is set lower than your radiator circuit switch-off temperature – otherwise electrically-heated water would run your radiators at all times you don’t have a fire going, which probably is not what you want.
Underfloor Heating
[Is the below with the need for a buffer tank even true to keep the underfloor from overheating, though?? What would prevent just using a dedicated coil in the primary cylinder (as with radiators) driving the underfloor directly, via a circulating pump? That pump would just need to be controlled by two thermostats: one located on the cool water pipe that feeds the wetback, and located as close to the HWC as possible (this gives us our cylinder temperature, ‘X’); the second is located on the return pipe of the underfloor heating, as close to where it leaves the floor as possible (this gives us our water return temperature, ‘Y’).
If the circulating pump is set to only run when these two conditions are met: X > say 70 degrees (so the cylinder has hot water to spare) and Y < say 40 degrees (the floor is not overheating!) then the pump and underfloor circuit could only ever kick in and operate for as long as there is hot water available AND the floor is staying not overheating; right?? Obviously you’d want to be able to tweak the ‘X’ and ‘Y’ settings to suit accordingly. If this sounds more straightforward/workable than the below, please discuss with a plumber! Again, I am not a plumber/central heating designer or anything – Zak]
Underfloor heating is accepted as the very best kind of heating, as it puts heat into the absolute lowest part of the room, letting it then warm the entire area as it rises. Because it’s the best, we’re going to tolerate some extra complexity to get it all working!
Unfortunately, it’s only really the sort of thing you can do in a new build (or extensive renovation that involves re-flooring!), and you have to work it all out and commit to it from the onset, before pouring the concrete slab floor (with radiators, people could install just the coil-equipped cylinder, see how they get on with no radiators, add a couple of the higher priority ones, see how those go, then later still extend their parallel circuit with extras as desired).
There is a very significant difference between what we’re doing with radiators above, and what we’re doing with underfloor heating. Namely, underfloor heating has a much lower maximum allowed temperature for the circulating liquid. When a radiator panel becomes too hot to comfortably touch at the higher operating temperatures, we haven’t been terribly concerned – you just don’t touch it. But if underfloor heating was to become too hot to comfortably touch, just walking around your home would become a problem! With radiators, we didn’t want to ever be pointlessly circulating cooler water; now we need to also make sure we’re never circulating water that is too hot.
This is an extra layer of complexity we have to contend with as we think about what we hope to achieve. In a more regular type of underfloor heating situation, the underfloor circuit might just be fed by a controlled heat source, like a gas, oil or diesel burner that simply switches on and off as needed to keep the underfloor within the desired heat range (this would lend itself very easily to timers too). We’re dealing within the limitations of fire though, and have to work out how to manage it.
Here’s the kind of system I think would be well suited, though it did kill me a little inside having to sketch in the solution (something I derided earlier as being inelegant) – a second cylinder:
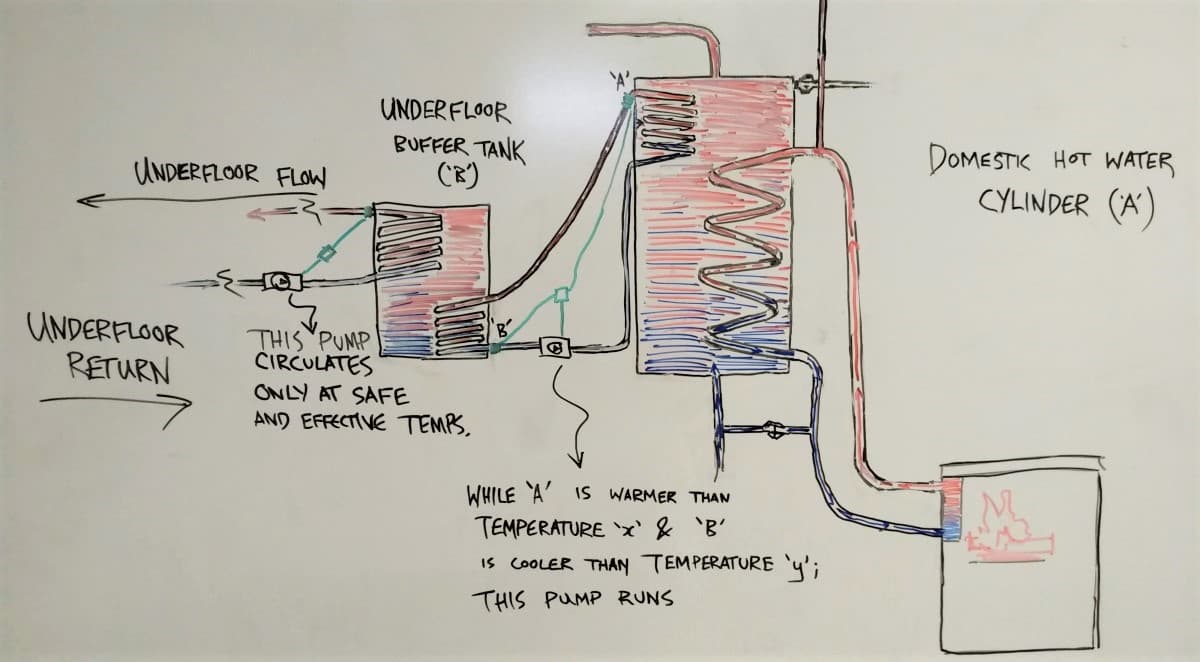
OK, so what’s going on here? We have our domestic hot water (Mains Pressure, but could either of the other options) and our indirect coil is still doing its thing, with the water jacket open vented and passively circulating just as we like to see it. But where we last saw a coil in the upper parts directly feeding radiators, now this coil instead connects to a dedicated buffer tank – a secondary (and generally smaller) cylinder whose sole job is making sure the underfloor circuit is only ever being served water at safe and effective temperatures.
The domestic hot water cylinder / buffer tank circuit is thermostat controlled, but in a more complicated fashion than anything we’ve seen thus far. There are two conditions that must be satisfied for this circulating pump to switch on: the water temperature in the buffer tank must be lower than the underfloor’s maximum (it wants heat), and the temperature of the water in the primary cylinder must be high enough that we won’t miss it for our domestic use (it has heat available). This circulating pump switches off as soon as either of those things is no longer true: if the buffer tank reaches the maximum temperature for the underfloor, or the domestic cylinder has dropped to the point where it has no excess heat to part with.
The underfloor heating circuit is now very simple. It runs (again, thermostat-control!) just whenever and for as long as the buffer tank has heat available. It does not need to worry about overheating, as the buffer tank itself keeps this side of the system down below the maximum serviceable temperature. If the buffer tank drops below some minimum temperature under which it no longer makes sense to send fluid through the underfloor (the domestic cylinder has cooled enough to be selfish, and is hoarding its heat) it switches off. When back warmed up, it switches on again. That’s it.
If you were wanting to set up some kind of timer (to set periods within which you never want the underfloor to be operating), you’d be doing that on the pump that controls the cylinder-to-buffer-tank circuit (so you’re not pointlessly heating the buffer tank over periods the underfloor doesn’t even need it).
Other considerations with underfloor heating:
Parallel / Non-Contiguous
Just like with radiators, you will still want your underfloor heating areas to be set up in parallel and not series (otherwise would circulate already-cooled water through later sections or to rooms further away), and I’m sure there must be some rule like: ‘run no more than ‘x’ m of underfloor heating before returning it back’. That is to say, rather than have an entire 5 x 5 m room form one continual spiral of underfloor heating (such that the hottest would always be the outside, nearest the feed, and coolest in the centre), you would want to break it down into sensibly-sized, discrete, configurations that each feed and return in parallel to one another, averaging and evening out your heat distribution across the entire sections of floor.
Sizing the System
I cannot vouch for the veracity of this, but I was once told: allow 1 kW of hot water production for every 10 m2 of underfloor heating. I do not know what pipe diameter or configuration this 10 m2 looks like! Talk to underfloor heating experts. You won’t need underfloor heating in the area your Homewood is installed.
Alternatives to a Buffer Tank
There are sophisticated manifold systems that employ heat exchange principles to maintain the suitable temperature range instead of a dedicated buffer tank, but I don’t know a lot about them. A buffer tank seems ideal with our flavour of uncontrolled heat source, but again – talk to an underfloor heating expert!
Vents / Header Tanks / Expansion?
I haven’t shown anything in my diagram at all, as I’m not sure that any of it is necessary. In theory, the buffer tank and underfloor circuits could be permanently closed systems, never able to boil or need replenishing (they are well-removed from the uncontrolled heat source, with the TPR valve or open-vent on the domestic cylinder taking care of things upsteam of them in the event of temperature rise), and the temperatures are kept low enough that expansion is not causing us any pressure issues. Your friendly expert may have other ideas! Get them to correct me.
Other than that, read everything I talked about re: radiators above and remember that choosing between radiators vs. underfloor doesn’t necessarily have to be an either/or thing (though you wouldn’t be running the radiators off the buffer tank – they’d need their own coil). You could have underfloor in a concrete floored bathroom, while still having radiators in wooden floored bedrooms – for example.
Supplementing with Electric or Gas
For many people, it makes a lot of sense to supplement your water jacket system with an alternative, complementary energy supply. Your stove is unlikely to be in constant use absolutely all the time; especially over the summer you may prefer to run it far less (or even not at all). While we do have many customers off-grid for whom their Homewood is their sole source of heating, cooking and hot water, all year around, that’s certainly not going to be true for everyone.
Also, supplementing your water jacket-produced hot water with another supply might let you achieve more ambitious radiator or underfloor heating setups than just a cook stove would allow.
The three most common ways to do this are:
– electric (simply an element in your cylinder)
– gas califont (using natural gas to heat or boost water)
– solar water heating (I like this a lot, and will give it its own section)
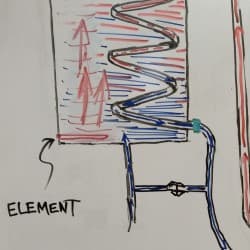
Electric Element
Electricity is by far the most common supplement. Here, the cylinder to which you have connected your water jacket still has a regular domestic element installed, capable of heating your water using electricity. Most cylinders, even those with water jacket connections or coils, still come with this element as standard.
Thermostat-controlled, you could simply leave this on (normally set to 60 degrees here in New Zealand). When you go for an extended period without the stove running (or have higher-than-normal hot water demands), and so the water temperature in your cylinder drops, your element runs, maintaining your cylinder at – or helping it get back up to – 60 degrees.
Alternatively, you may completely turn this element off over the cooler months, only switching it back on again once the weather warms and you plan to run your stove far less. We’ve had customers install a Homewood, connect their water jacket, switch off their electric element, and never switch it on again. But nice knowing it’s there if needed.
That’s it – there is nothing more complicated to know than that (well, unless it’s solar-generated electricity, see below!).
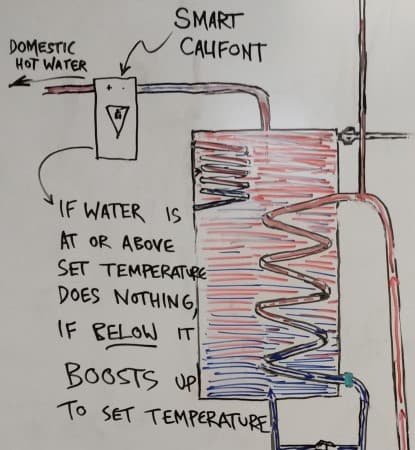
Gas-Boosted Hot Water
These days, natural gas califonts are seeming to become increasingly popular, and there are two ways I’m seeing people use gas water heaters to supplement their systems.
The first, most obvious way, is to simply have a separate section of household plumbing that runs off of its own dedicated gas califont. This may make sense where you have the stove toward one end of the house, and the water jacket provides you with domestic hot water for your kitchen, laundry and/or bathroom at that end, but have other bathrooms or hot water needs at the other end, or away upstairs somewhere. Rather than inefficiently run the long plumbing, you’ve opted to use gas there instead. Not a bad idea.
The second way seems to be something that not too many people are aware is even possible, much more complementary, so I’ve been recommending it to people who want to incorporate gas ever since I learned of it: installation of a special califont downstream of your hot water cylinder. I first stumbled on these as ‘solar califonts’, designed to kick in and pick up the slack when the sun wasn’t shining. It’s the same thing here.
A califont installed on your main hot water line like this, downstream of the hot water cylinder, will never operate while the water in the cylinder is at or above the temperature set for the gas boost (normally 60 degrees), but if water passes through the califont that is below the set temperature (the fire has been out and normal use has seen the cylinder cool), the gas-heating kicks in, instantly heating it exactly as much as needed to bring that flowing water back up to an even 60 degrees.
Best of both worlds: the luxury of endless hot water being instantaneously heated on demand when needed, coupled with the economy of water that is getting heated every time you have a fire running. Just make sure it’s a smart califont that heats based on the temperature of the water coming in, and not just blindly on the flow rate!
Now, if you don’t like that LPG is a fossil fuel, or that you’ve lost self-reliance, or you’re worried about unpredictable ongoing costs, and would prefer something more renewable, [all good reasons for why I personally am not a big fan of hot water heating solutions that involve gas] let’s take a look at a more brilliant, even more highly-complementary and increasingly-popular way to supplement your hot water supply…
Solar Water Heating
This comes in two main flavours: solar water heating, where the sun is directly heating up the water, or using solar to generate electricity to then heat your water with.
Solar water heating is very similar to water jacket heating, only here, the solar water panel takes the place of the jacket and the sun becomes our fire!
All the same things we discussed with water jackets also apply here: the sun is an uncontrolled heat source, water getting heated expands, and you need safe ways of dealing with unexpected rapid expansion.
Solar water heating is the perfect complement to a water jacket: on those cold miserable days that your solar system is producing minimally, you have a lovely fire going; on those beautiful sunny days where you don’t run your fire, your solar is at peak performance!
It’s an off-grid dream-team: solar picking up the slack over summer when you are running the stove less or not at all, and the water jacket doing the heavy lifting over the colder months when the stove is in near-continual use.
Here’s what a typical system might look like:
I’ve made the water jacket system in this example just a Mains Pressure System again, but this could just as easy be either of the other types. The different part we’re looking at here is the solar circuit.
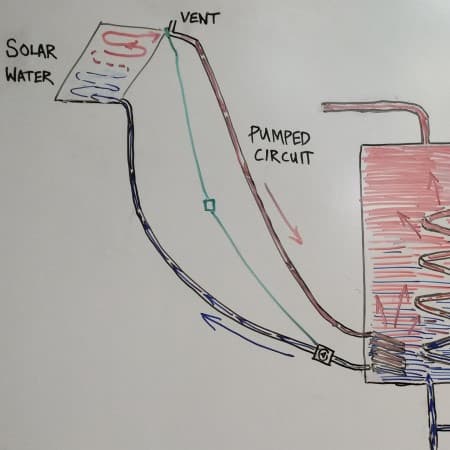
The solar is heating the cylinder indirectly (and we’ve learned how that works with heat exchange), connecting to a solar coil, now in the lower portion of the cylinder (we’re wanting to heat the cylinder, so introducing our heat low down). I believe solar is always indirect, as you need to have additives in the water to prevent freezing in the case of ice or frost as it circulates out-of-doors, and you need to keep those additives separate from your domestic hot water. [Not true: you can have sophisticated ‘drain back’ systems where the entire circuit evacuates if temperatures are getting too hot or too cold; eliminating any fear of freezing or boiling or contamination – talk with solar specialists about what best suits you, your home and your climate!]
The solar circuit has an expansion vessel (not shown) to accommodate pressure changes, and a vent for if it boils. If there are additives to prevent freezing: you don’t want this venting somewhere you’d collect it and contaminate your water supply! You’d also need to have provision for replenishing the additives.
It’s pumped, because the solar panel is up on your roof, and thus typically higher than the hot water cylinder you are trying to heat, so as with radiators or underfloor heating you again can’t rely on natural thermosyphon to push that heat down.
Now, you don’t want to turn your solar panel into a radiator (allowing it to be stealing heated water from your hot water cylinder) while the raised solar panel cools overnight and the coil in the cylinder stays hot, so you need provisions against back-circulation in your pipework.
Likewise, you need the circulating pump’s thermostat-control to be located in a smart place: it should be at the hot water flow line (the line transporting the heated water from the solar panel to the cylinder), as close to the panel as possible, and operating on a single step. That way, as soon as the water within the panel is sufficiently hot, it kicks in, pushing it down to the cylinder. Yes, it will operate in bursts for a time while the system is first heating up, but so long as the coil within the cylinder is appropriately-sized (ie: slightly larger that the production of the solar panel in kW) it will equalise, settle, and run throughout the day. As the sun fades, the panel cools, the temperature in the circuit drops, the thermostat registers this, and the circulating pump switches off. You want this temperature to be set significantly high, such that you are not maintaining the heat in the solar circuit from the heat of the hot water cylinder (again – you don’t want it ever acting as a radiator, it is for adding heat into your system, never for taking any away!).
Sometimes, you may be able to set up something like this:
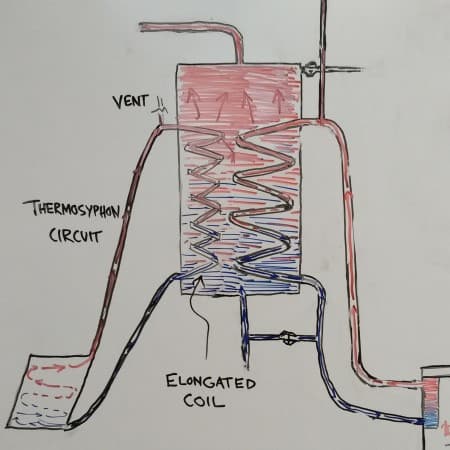
Here, the hot water cylinder is able to be located sufficiently high that both the water jacket and the solar panel are able to passively circulate via thermosyphon.
Some things to watch for:
– the solar panel must be in S or ladder-type configuration (almost certainly will be the case anyway) so that the cold water can enter the bottom, get heated, and constantly flow upward without interruption, to exit at the top (just like in a water jacket) and,
– you should follow all recommendations regarding height differences and run distances as laid out in the cylinder locating section above, and,
– you must make sure that the coil you are connecting this to in the cylinder is elongated for thermosyphoning (just like a water jacket coil). Because solar is far more usually pumped, anything called a ‘solar coil’ in the lower portion of a standard cylinder will likely not be a thermosyphoning coil, and will most probably instead be too squat and compact to allow for passive thermosyphoning to occur effectively (but would work just fine for pumped solar). As with a water jacket, you need a coil that stretches over much of the cylinder and correctly sized to allow the coil water to equalise with the cylinder water before leaving.
Make sure you know what you’re getting.
This kind of completely passive, solar heat is perfect for people not on the grid – you don’t even have to worry about generating any electricity for a circulating pump!
However! Having laid out all that, over the last few years I am seeing an increasing number of completely off-grid customers just opting for regular electric elements, due to solar electric panel technology (and the associated batteries) becoming increasingly impressive and affordable. I believe the significant draw of an electric element in a cylinder can be a useful “overflow” for times battery banks are fully charged – but please appreciate that while yes I’ve said I am by no means a plumber, I am certainly not an electrician!
And on top of that, I’ve also started hearing a lot more about solar-powered heat pumps running hot water, for efficiency/lower power consumption reasons, but I don’t know a lot about it [yet!] – although I understand your plumber needs to be aware that it is going to mix with an uncontrolled heat source, so needs to have set up some way for “overheated” water to not circulate through the heat pump.
Still, the purist in me loves the totally passive, non-electric option.
Putting it All Together
Here’s roughly what all of this could look like, if you combined absolutely everything:
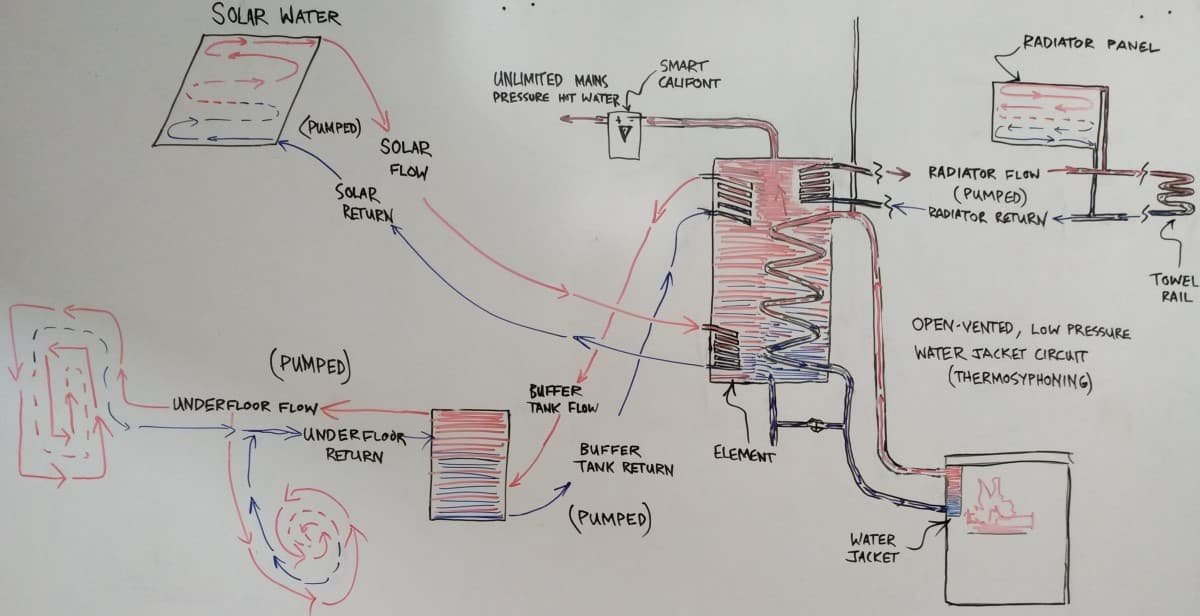
Stove, water jacket, mains pressure coil, electric element, high pressure hot water, gas-assisted boosting if ever needed, solar system, running both radiators and underfloor heating. It’s entirely possible, though of questionable desirability! You’ve more heating sources there than you’d ever likely have call for, though plenty of backups and redundancies.
As Specifically Relates to Homewood
While I have often referred to our stoves in my examples, there is nothing in this article that is uniquely particular to what is going on with us. Everything I’ve outlined applies just as much to any time you are heating water using fire and a water jacket (well, unless talking commercial boilers and the desired production of steam). You could have just a regular fireplace, a wood heater, an antique coal range or a model from a competitor: if you’re trying to use it to heat hot water, this is all just as relevant! It’s just the numbers that change.
If you find this information useful, please use it! If you’re a plumber, installer, a heat shop owner, or even a direct competitor: I hope this information is helpful, and I do not mind at all if your refer to it. You have my permission to direct whoever you like to this article: even if it’s someone buying a completely different brand of cooking stove off of you. I just don’t grant you the right to reproduce any of this elsewhere (in part or full) or pass it off as your own.
Just remember: these are not plumbing schematics! I don’t show all the required valves (I don’t think I’ve even mentioned non-return valves? Will normally have one on your cold water supply coming into the cylinder – but I should at least say to never put any kind of valve on any part of your water jacket circuit! Remember: we want the water jacket to always be connected to an open-vented, low pressure system, able to thermosyphon naturally. Don’t attempt to assist circulation with valves) or fittings, nor have delved down into the nitty gritty of crox nuts (compression fittings), hemp and graphite, braising or anything like that! This isn’t supposed to be a DIY Plumbing How To Guide. [I should add a final section maybe? ‘Things Not Touched On’ or similar, to briefly explain why I am not getting into specifics about this type of thing?]
If you’re reading this in conjunction with planning for one of our stoves though, here are the specifics you need to know as relates to our various models.
Ours in general:
All our water jackets, no matter the model or configuration, are made from copper. This means water can happily circulate through our stoves, and remain potable without any fear of contamination. We use copper for this reason, but also because Clause G12 of the New Zealand Building Code only allows for these kinds of systems where the water jacket is copper (so I don’t know quite what is going on for other stoves – both antique and new – that may have a cast-iron jacket instead [they probably just have to always be indirect systems?] – I can’t help you there, sorry!).
Copper has a relatively low melting temperature for a metal, so in order to maintain their integrity, our water jackets rely on water being present within at all times. Never run your stove without the water jacket being connected to water.
If your Homewood is part of emergency planning for times of electrical grid failure, but your water system relies on that very same electrical grid to push water around – rethink things! Maybe a pumped header tank somewhere that feeds your hot water system (or supplies your entire household water), giving you a big buffer between electricity failing and running into problems of supply, or investigating full off-grid options.
For any actual emergency situations (eg: I had customers call me after Christchurch and Kaikoura earthquakes had knocked out their electricity supply) where you can’t guarantee that water is going to continue feeding into your water jacket: don’t worry about damaging it, a water jacket can always be replaced. Far better to still run the stove, keeping warm and fed (and being reduced to heating water in a pot on top!) than being precious about your water jacket. Should you ever find yourself in this type of situation, you could put some extra fire bricks or similar in front of it to insulate, slow heat transfer down and try protect it.
If you are burning wood that might contain nails, take care to not puncture any copper!
If you ever do notice any unexplained moisture (eg: wet ashes in your ash pan, or any kind of weeping anywhere in the firebox, or out the ash compartment), investigate for cause immediately. If a water jacket has failed for any reason it’s important to speedily replace in order to avoid any water damage to the iron of your stove. While waiting to replace, run the stove as much as possible, in order to be constantly driving that moisture out – or in case of serious failure, disconnect and drain the water jacket completely, then run a fire to dry everything out (no longer worrying about melting an already-compromised water jacket).
All our water jackets are to be connected to the cylinder via 25 mm copper pipe. They either have 25 mm brass male threads, or 25 mm brass female sockets, depending on the configuration: always British Standard Thread (BSP – I believe used at least in New Zealand, Australia and the UK; but if you’re installing elsewhere your plumber will fit brass adaptors to these to then match your country’s standard).
Any kW rating I give for the below models are what you can expect in normal use, where recommendations on plumbing runs and height differentials have been followed. By normal use, I mean a stove that is being run at sensible oven temperatures that you can actually bake on, not theoretical maximums that would see your stove glowing red hot. These are cooking stoves, after all! I have determined these outputs by actual tests run at usable oven temperatures on the Homewood Heritage (both regular and advanced options), and extrapolated down and up for the Companion and Matriarch models, respectively, based on their changed firebox volume and water jacket surface areas.
I have learned a lot since I did that testing (for example, my test cylinder wasn’t actually elevated the required 300 mm!), and our water jackets have gone through minor changes since then, so one day I would like to set up to run tests again (and do the other models at the same time). This information will be updated if and when relevant.
Homewood Heritage:
Regular water jacket: 4 – 5 kW in normal use. Occupying the rear wall of the firebox, you have options for piping that comes out the back of the stove (toward the left), or the left of the stove (toward the back), both as 25 mm brass male thread only. This jacket gives plenty enough to run domestic hot water, and if you’re a low consumption household (single, or retired couple, or so on) may even find you end up with too much (no drama – just get in touch if boiling is more than a very rare occurrence – there are ways to reduce efficiency and slow it down).
For situations in which you want even more water production, the Heritage can be fitted with our advanced water jacket: increasing the output up to 8 – 9 kW in normal use; this sees the pipe connections at the back of the stove, further to the middle, as 25 mm brass sockets only, with no option for anything different (our advanced water jacket does not occupy the rear wall of the firebox, instead it takes the place of the bricks on the right hand wall of the firebox). Where you opt for a Heritage with advanced water jacket, I would recommend you elevate the base of your cylinder above the 300 mm minimum given in our Installation Specifications, if at all possible.
In addition to having a larger surface area for heating, the advanced water jacket has a more sophisticated configuration and construction, and comes at an extra cost. Because the kW outputs we are taking about relate to the temperature of the oven, and not a fixed amount of fuel being fed into it, I have always assumed that the higher output does at least partially come at the price of greater fuel consumption in order to keep the oven up at the same temperatures, though I have never noticed (nor attempted to measure) any meaningful difference, and I’ve never had a customer with an advanced wetback report excessive fuel consumption (though they’re unlikely to have any useful benchmark for meaningful comparison!).
All these pipe position options are detailed in our Installation Specifications, though we recommend confirming anything critical only once you have your individual stove on site.
220 L hot water cylinder should be considered an absolute minimum, but I urge you to go larger: 300 – 500 L (or more if you have the space and inclination!). See my discussions on sizing above.
I generally suggest you hold a couple of kW in reserve (for maintaining your domestic hot water) when planning any radiators (so 2 – 3 panels at 1 kW ea for the regular water jacket, or 6 – 7 with the advanced), but if you have fully read and understood my section on radiators above, you will understand my recommended set up gives you greater flexibility here.
Homewood Companion:
Water jacket has an output of 3 – 4 kW in normal use. Pipes are positioned either out the back of the stove (toward the left), as 25 mm brass thread, or out the left side (toward the left) as 25 mm brass sockets.
These pipe position options are detailed in our Installation Specifications, though we recommend confirming anything critical only once you have the stove on site.
Still recommend at least 220 L hot water cylinder, with the strong encouragement to go higher (300 – 500 L +) if possible. See my discussions on sizing above.
If sticking with my general suggestion to hold back a couple of kW, you’d be looking at only running 1 – 2 radiator panels at 1 kW each, but if you have fully read and understood my section on radiators above, you will understand my recommended set up gives you greater flexibility here.
Homewood Matriarch:
Water jacket has an output of 5 – 6 kW in normal use. Pipes are positioned out the back of the stove, toward the middle, as 25 mm brass thread. No option for pipes to come out anywhere else, due to the position of the firebox in the Matriarch. I would recommend you elevate the base of your cylinder above the 300 mm minimum given in our Installation Specifications, if at all possible.
These pipe positions are detailed in our Installation Specifications, though we advise confirming anything critical only once you have the stove on site.
220 L hot water cylinder should be considered an absolute minimum, but I strongly urge you to go larger: 300 – 500 L, if not more. See my discussions on sizing above.
Following my general suggestion to hold a couple of kW in reserve (for maintaining your domestic hot water), you could be running 3 – 4 radiator panels at 1 kW each (greater flexibility granted by my set up recommended in the section on radiators above).
Unfortunately, we do not offer any higher output water jacket options on the Matriarch, despite it having a significantly expanded firebox over the Heritage (which we are able to fit a larger capacity option to), due to the limitations that exist in the Matriarch’s more complicated oven circulation (and the fact that it is driving those extra ovens!).
Sourcing What You Need
Generally, your plumber will be able to source and supply everything you need, local to you and your install. They may often have preferred suppliers.
If you are ordering a Homewood from us here in NZ (particularly in the North Island), we can help you source some of these extra things if you like, though as we’re not involved with the installation at all, you may rather keep it all in-house with your installer.
We have an Auckland-based supplier for water cylinders, of all styles, configurations and sizes. We can source you solar water panels (and I believe associated pumps/etc too) through the same supplier.
Email us for quotes, and feel free to compare with what you (or your plumber!) can sort locally – especially in the South Island you may find that any savings I can get you just get eaten up by extra freight charges.
We unfortunately don’t supply any radiator panels nor pumps, components or fittings for hydronic systems or anything like that ourselves [yet?], but here are some of the central heating suppliers that I know at least some of our customers have used:
Belle Comfort (Hawkes Bay, but can supply nationwide)
(Not an endorsement, nor a snub of others not included – these are just people I am at least aware of! Get in touch if there’s others I should add)
Central Heating New Zealand
Heatsmart
Savona
You may well find that some of these types of places wish to up-sell you to a full central heating solution (great if that’s what you want!), so my recommendation would be to have at least an idea of what you’re wanting (eg: 3 panels for 3 bedrooms; one for a bathroom – and so on) and what your expectations are for it all before approaching anyone like this.
– Zak, June 2019